3.5.2.1 ANPR
ANPR settings consist of Settings, List Management, Black List Mode, White List Mode and Visitor Mode. Here are some notes for using ANPR function.
- Insert available HDD to NVR.
- Upgrade your device to corresponded firmware version.
- Camera: V4X.7.0.72-r16 or above
- NVR: V7X.9.0.7-r7 or above
- Ensure both camera and NVR support LPR/ANPR function. Up to 16 ANPR channels are supported for Milesight NVR.
- Ensure that NVR can get license plate information. Please set TCP which is the default mode as Post Type. It can be set in Camera web page Settings -> LPR -> General Settings interface.

Settings
Do as following 5 steps to enable ANPR function. Camera will start to detect license plate and NVR will start to receive license plate information once these steps are done.

Step 1: Select a channel and enable ANPR function;
License: Generated by camera’s information
License Status: Show present license status, including Valid, Invalid, Expired, Inactivated
Step 2: Select processing resolution. The further distance you detect, the higher resolution is needed. 1280*720 by default;
Step 3: Enable LPR Night Mode, then you can set LPR Night Mode Effective Time. There are two options available: Customize and Auto. Auto option supports automatic switch between day and night.


Step 4: Set ANPR function effective time;
Step 5: Set detection parameters including Detection Trigger, Confidence Level, License Plate Format, Repeat Plate Checktime and Features Identification;

Detection Trigger: Always and Camera Alarm Input are available. It will only detect information when alarm input is triggered if you select Camera Alarm Input.
Confidence Level: You can set the Confidence Level, and the higher the level, the more accurate the identification is.
Repeat Plate Checktime: The same license plate information won’t be received on NVR within the time you set.
License Plate Format: Set corresponding License Plate Format to screen out license plates conforming to the count and format you set to improve recognition accuracy.

- Click
 to add a License Plate Format.
- Select License Plate Character Count, which is 1-9.
- Fill in License Plate Format you want to detect. A stands for Letters, 1 stands for numbers and * stands for unrestricted type.
Push Correct Character Count Results Only:
If the count of the detected license doesn’t match your configuration, it will push correct character count results by completing or reducing characters automatically.
- Make sure your camera Version is 4X.7.0.74 or above.
- You can add 8 rules at most.
Features Identification: The selected features identification will be shown in ANPR logs interface.
Step 6: Set the detected ROI region which can be up to 4 regions. License plate will only be detected in the ROI regions.

List Management
Make a license plate list for your own NVR ANPR system. You can upload license plates and set them with different license type here. 10000 plates can be added at most.

There are two methods to add license plates:
- Add one by one.
Step 1: Click Add button ![]() ;
;
Step 2: Input the license plate and select license type;
Step 3: Click OK and then the license plate will be added into the list;

- Batch adding by importing template.
Step 1: Click ![]() , select USB device folder and
click OK to download Template;
, select USB device folder and
click OK to download Template;
Step 2: Input all license type and license plate number as Template shows;

Step 3: Click Import button ![]() , select the file and click OK to add all
license plates into list.
, select the file and click OK to add all
license plates into list.

Black List Mode/White List Mode/Visitor Mode
We provide you three modes for better event management, which is based on two license types.
Black List Mode: Manage event for license plates in black list.
White List Mode: Manage event for license plates in white list.
Visitor Mode: Manage event for those license plates do not have license type.

Step 1: Enable Black List Mode/White List Mode/Visitor Mode as your demand;
Step 2: Set effective time which means Mode works during that;
Step 3: Set action including Audible Warning, Email Linkage, Event Popup, PTZ Action, Alarm Output, White LED and Trigger Channels Record.
Audible Warning:NVR will trigger an audible warning when event is detected.
The user can set effective schedule as following two ways:
- Select the operation type: Audible or Erase. Then drag a square on the time
table for time setting. It will be more convenient by clicking
 or
or  to set or clear all time settings.
 - Click
 to edit record effective time manually.
Audio File: Users can select the audio file as needed for audible warning. The default is an audible beep.
Triggered Interval:The effective interval between two actions when event triggered.

Email Linkage:NVR will send an email to the address you set before.
The user can set effective schedule as following two ways:
- Select the operation type, Email and Erase. Then drag a square on the time table
for time setting. It will be more convenient by clicking or to set or clear all time settings.
- Click to edit effective time manually.
Triggered Interval:The effective interval between two actions when event triggered.
Picture Attached: Select whether to attach picture when sending Emails. If you enable it, you will receive alarm emails with one event captured picture attached.

Event Popup:Trigger alarm screen popup to full screen when alarm is triggered. And you can set display duration time of all triggered channel in ‘Settings’->’General’->’Device’->’Event Popup Duration Time’. Then triggered channel will be shown one by one as duration time.
- Select the operation type, Event Popup and Erase. Then drag a square on the time
table for time setting. It will be more convenient by clicking or to set or clear all time settings.
- Click to edit effective time manually.
Triggered Interval:The effective interval between two actions when event triggered.

PTZ Action:Trigger PTZ action when alarm is triggered. PTZ action includes Preset and Patrol.
User can set effective schedule as following two ways:
- Select the operation type: PTZ or Erase. Then drag a square on the time table
for time setting. It will be more convenient by clicking or to set or clear all time settings.
- Click to edit effective time manually.

And you can add PTZ Action by clicking ![]() .
.
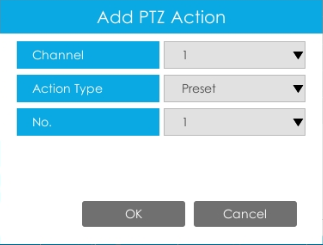
Channel: Select the channel which supports this function.
Action Type: Preset and Patrol are available.
No.: Select the number of Preset or Patrol.
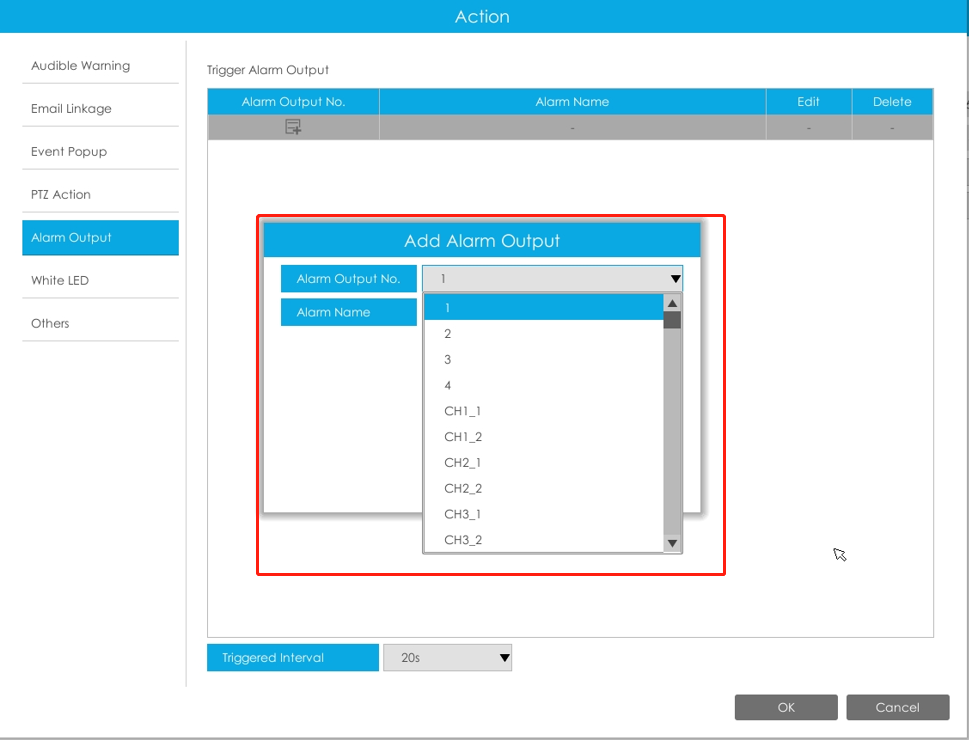
Alarm Output:Trigger alarm output when alarm is triggered. For NVR Alarm Output, the relevant alarm output will be firstly listed, such as, 1, 2.etc. As for camera Alarm Output, it will display as CHx_x (such as CH1_1) according to the camera channel and corresponding alarm number.
Triggered Interval:The effective interval between two actions when event triggered.
White LED:Trigger White LED flashing when alarm is triggered.
The user can set effective schedule as following two ways:
User can set effective schedule as following two ways:
- Select the operation type, White LED and Erase. Then drag a square on the time
table for time setting. It will be more convenient by clicking or to set or clear all time settings.
- Click to edit effective time manually.
Triggered Interval:The effective interval between two actions when event triggered.

And you can add White LED by clicking .
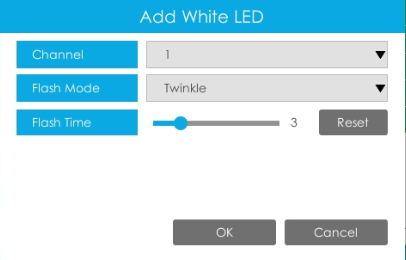
Channel: Select the channel which supports this function.
Flash Mode: Twinkle and Always are available.
Flash Time: Set the time for White LED flashing. When the Flash Mode is Twinkle, the range of Flash Time is 1~10 and the default value is 3. When the Flash Mode is Always, the range of Flash Time is 1~60 and the default value is 5.
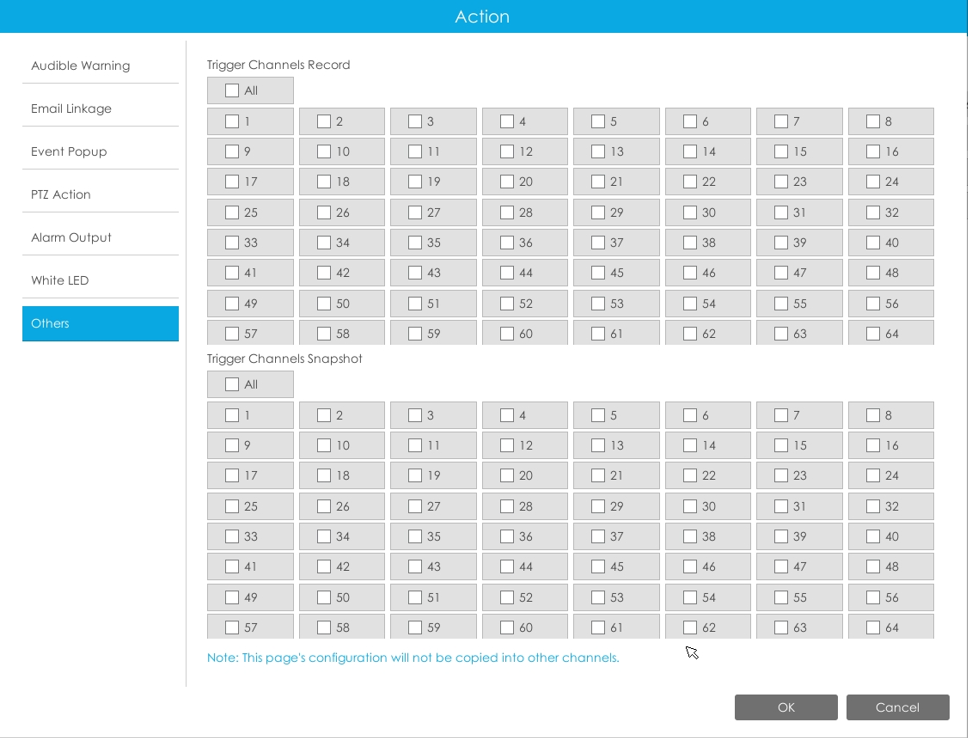
Others:Trigger selected channels to record when alarm is triggered.
- The list is exclusive for NVR, working with all LPR cameras you add. It won’t synchronize with the list on camera side.
- Do not forget to enable these modes, set effective time and record action for corresponded mode, ensuring that you can get real-time video when license plate is detected (Effective time and record action is enabled by default.)