4.2.1 Toolbar of Live View Window

The meanings of the icons on the toolbar can be referred to the table below:
|
Icon |
Function Introduction |
|
|---|---|---|
|
It will display a red icon in the upper left corner of the channel if it is recording. |
||
|
Click to view the video file in the last 5 minutes. Click Note: This item is available only for cameras which have video.
|
||
|
Click to turn on Speaker. You can adjust the volume of the speaker from 1~100. Note: This item is available only for cameras which support Audio
In.
|
||
|
Click to start talking Note: This item is available only for cameras which support Audio Out,
including ONVIF cameras.
|
||
|
Click to start Joystick Control and 3D Positioning for the camera live view. |
||
|
Click to enable Digital Zoom Note: The Digital Zoom can’t be used with PTZ 3D Positioning at the same
time.
|
||
|
Snapshot Note: Please configure the storage path first, otherwise a pop-up window
will inform you to set as below when clicking the button.
|
||
Start/Stop recording manually Note: Please configure the
storage path first, otherwise a pop-up window will inform you to set
as below when clicking the button. 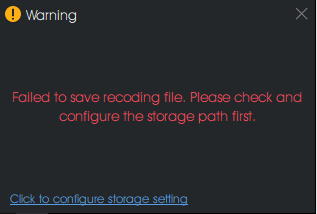 |
||
 |
||
|
||
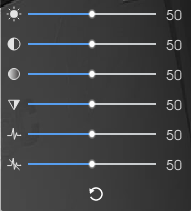 |
Brightness: Adjust the brightness of the scene Contrast: Adjust the color and light contrast Saturation: Adjust the saturation of the image. Higher Saturation makes colors appear more "pure" while lower one appears more “wash-out” Sharpness: Adjust the Sharpness of image. Higher Sharpness sharps the pixel boundary and makes the image looks “more clear” 2D DNR/3D DNR: Adjust the noise reduction level Default: Restore brightness, contrast and saturation to default settings |
|
|
Stop playing the Live View |
||

