7.1.1 Event Rules
The steps of adding event rule are shown as below:
Step1: Click ![]() button to add event rule as show below:
button to add event rule as show below:
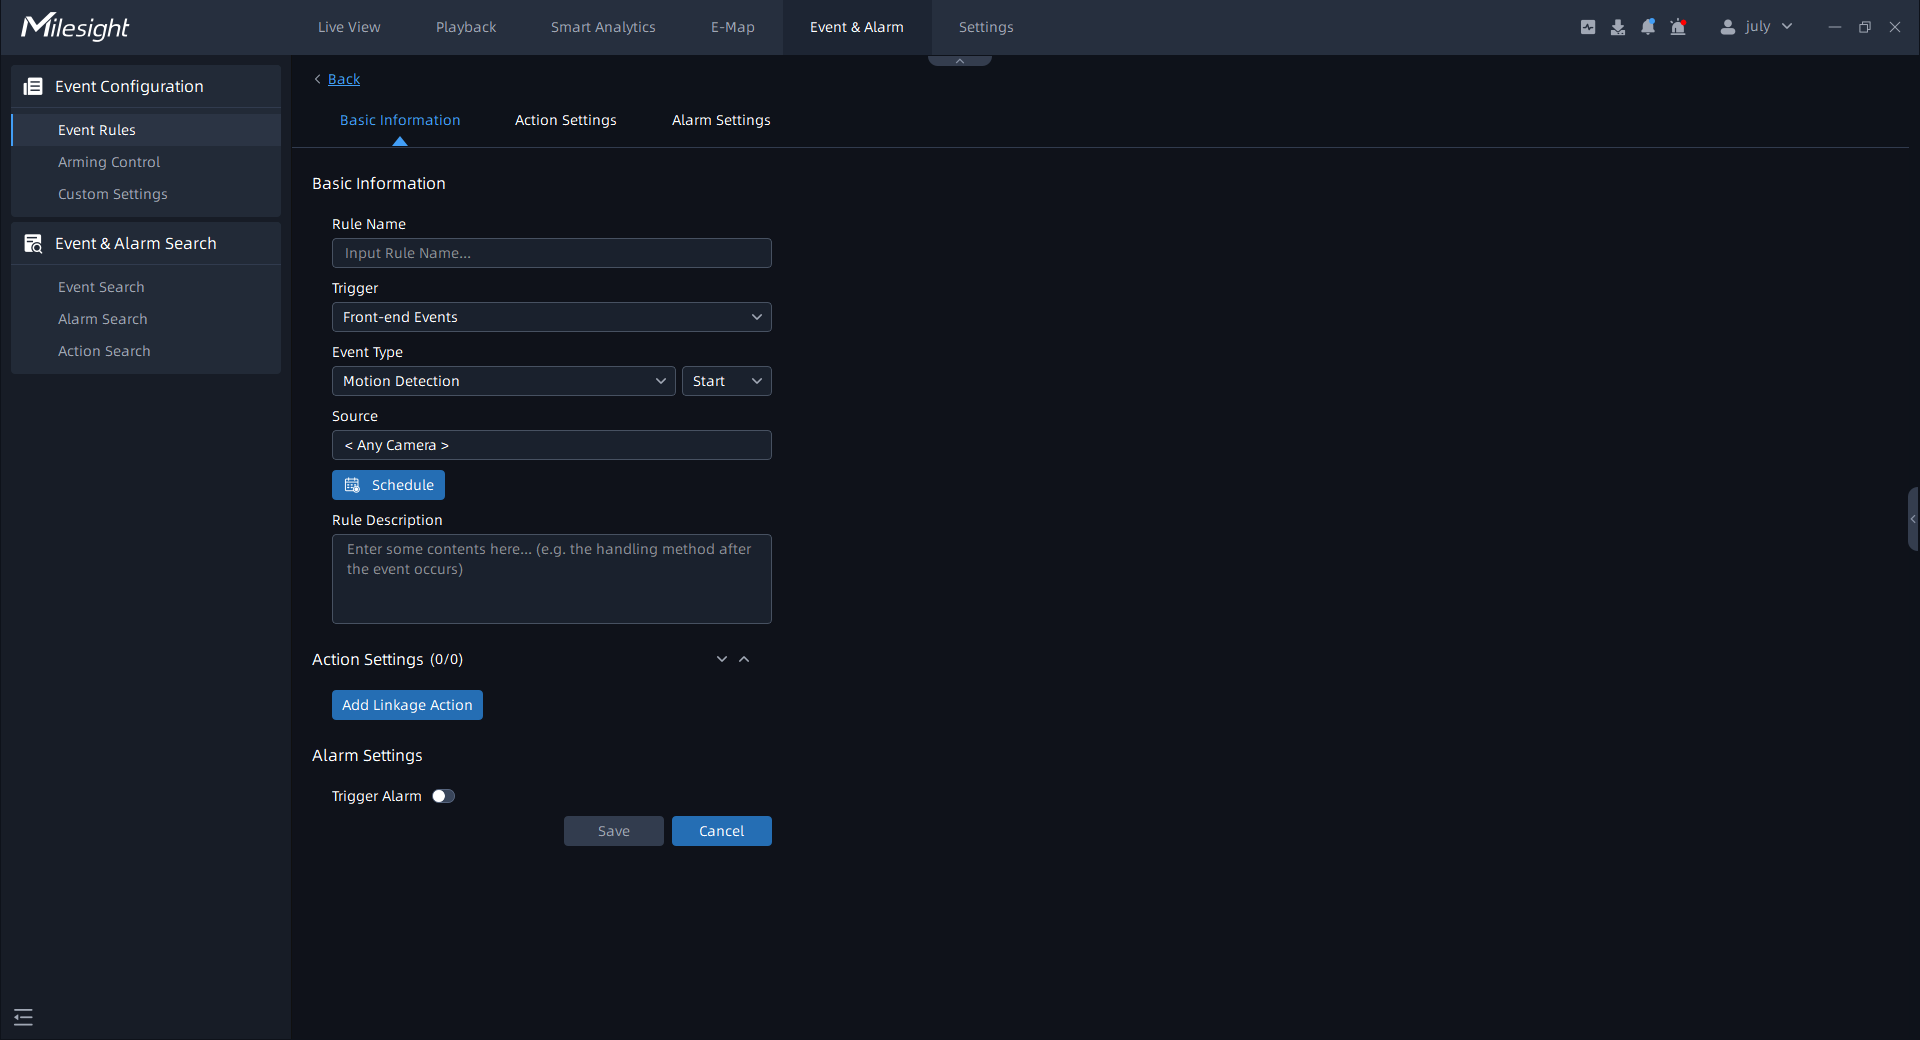
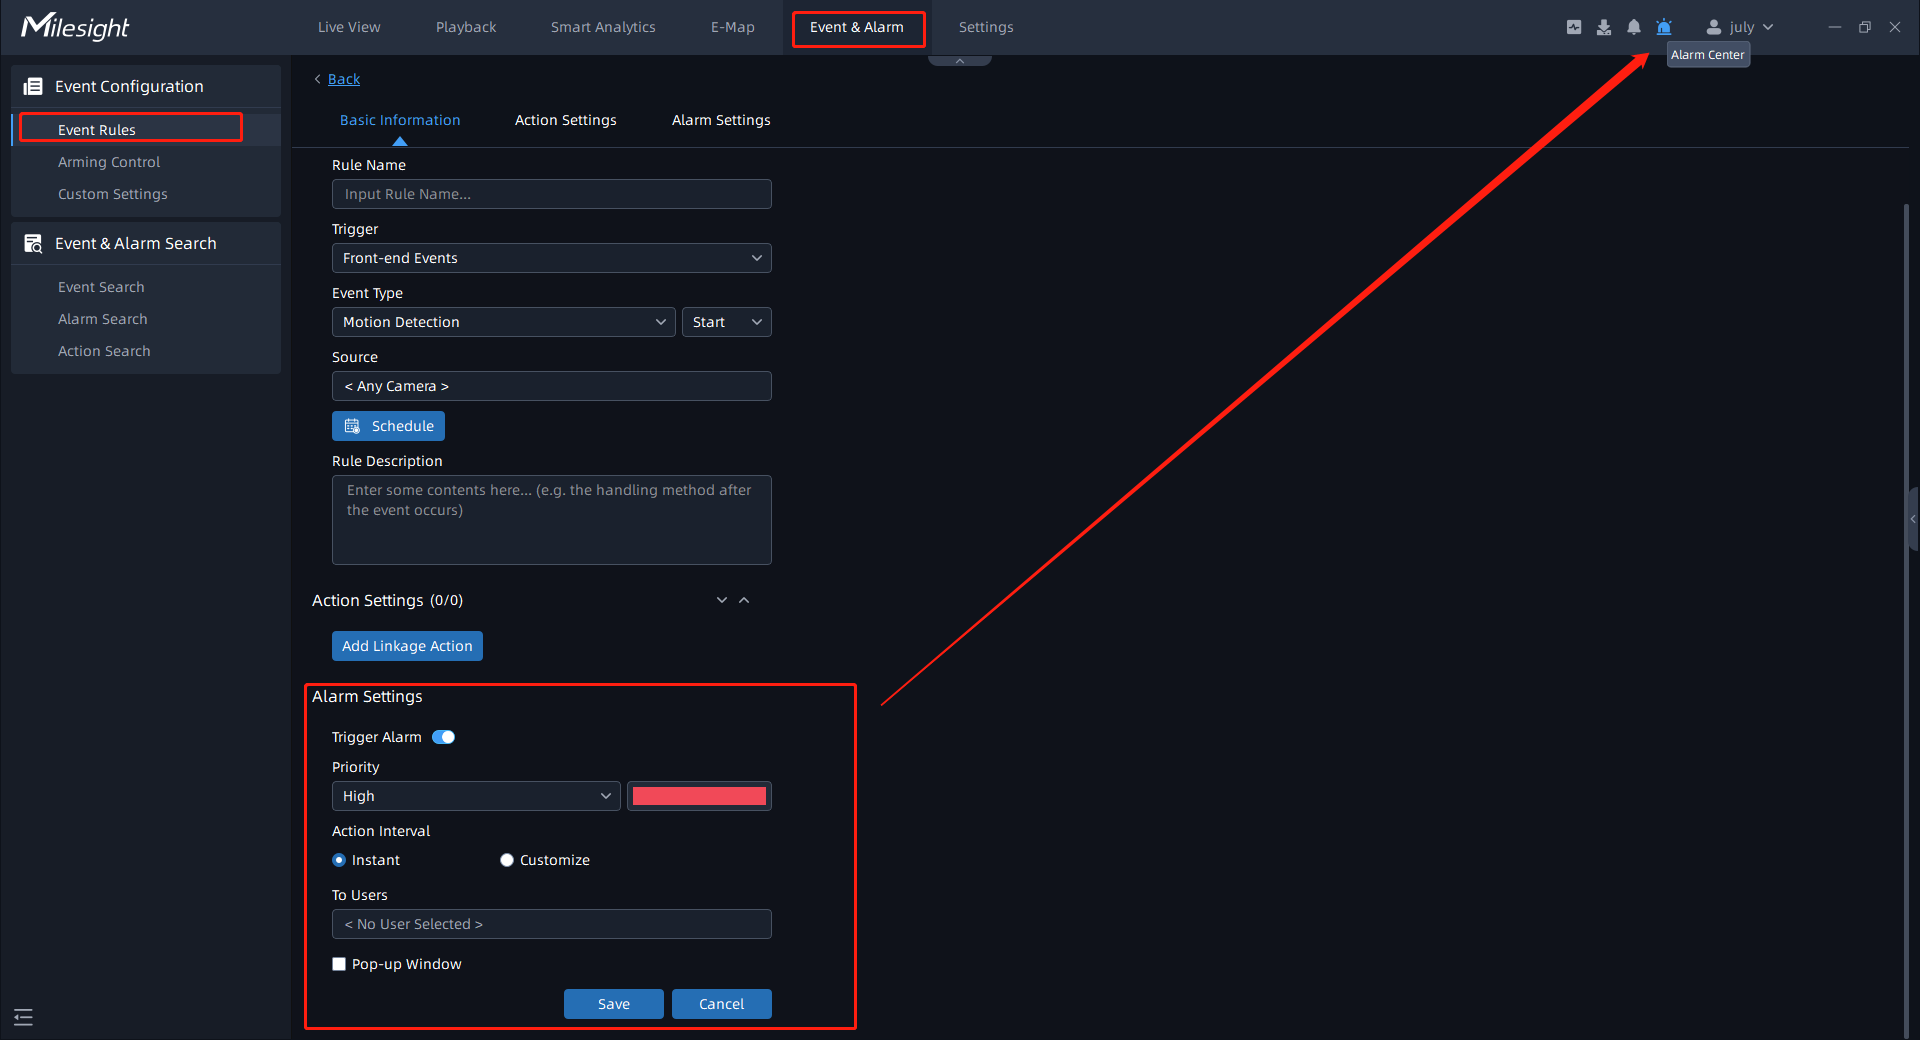
Here you can set event rules. Different types of trigger and action have different configuration rule items. Multiple types of action can be set for an event trigger. The meanings of the parameters on the page can refer to the table below.
Step2: After setting the event rules, click the “Save” button, then the event rule will be added to the event rule list and take effect.
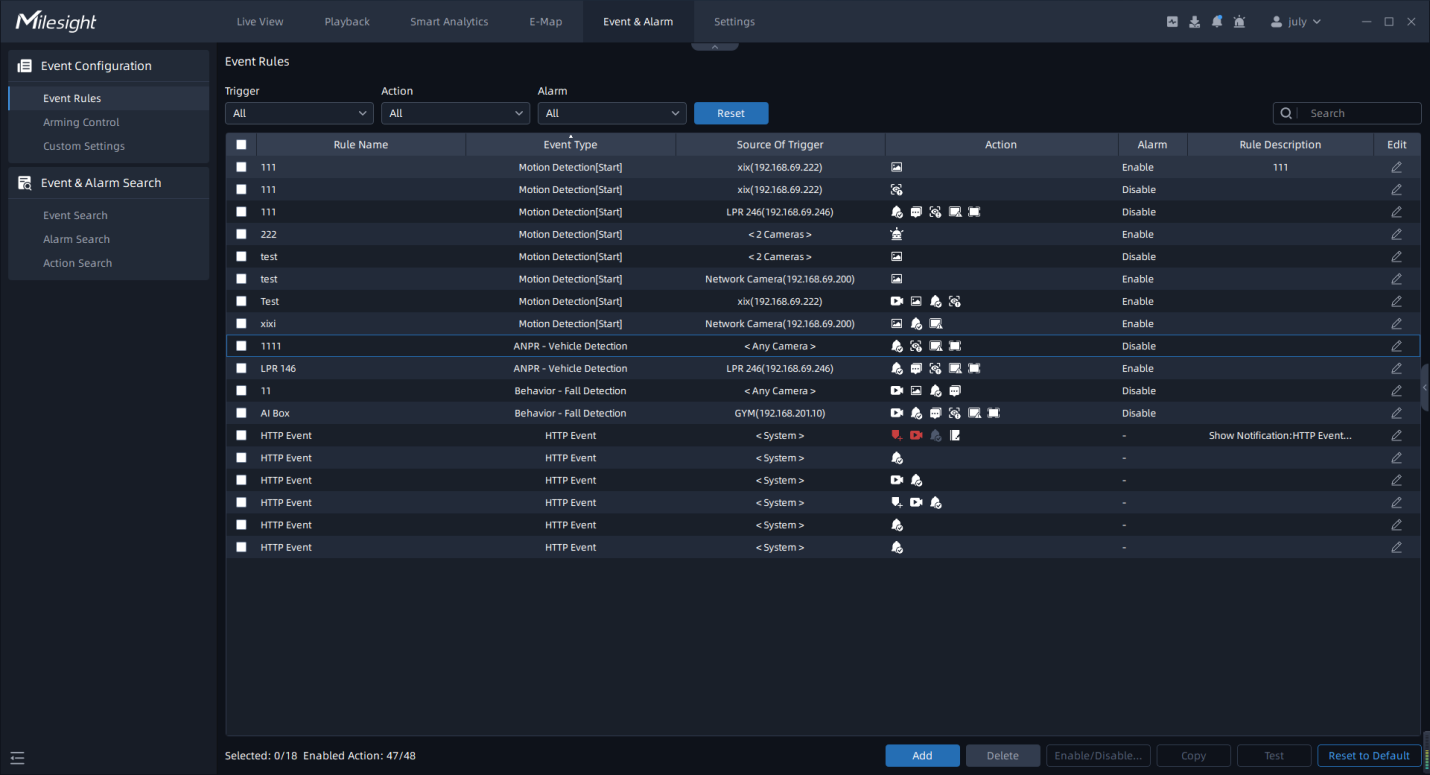
Step3: You can also click ![]() button, or double click event rule row in the list to
modify the selected event rule. Then click again the “Save” to apply the modified event
rule.
button, or double click event rule row in the list to
modify the selected event rule. Then click again the “Save” to apply the modified event
rule.
Step4: Check the corresponding event rules, and then click the ![]() or
or ![]() button to enable or disable the event rules in
batches. You can also click the
button to enable or disable the event rules in
batches. You can also click the ![]() button to reset the event rules to the
default,then the manually added rules will be deleted.
button to reset the event rules to the
default,then the manually added rules will be deleted.
Now our VMS supports setting kinds of event trigger, the meanings of trigger settings can be referred to the table below:
|
Parameter |
Function Introduction |
|---|---|
|
Front-end Event |
Front-end Motion Detection: When cameras detect object motion, the event will be triggered. The event trigger has two statuses including Start and Stop, you can set different camera sources and schedules for different states. The page is as below: 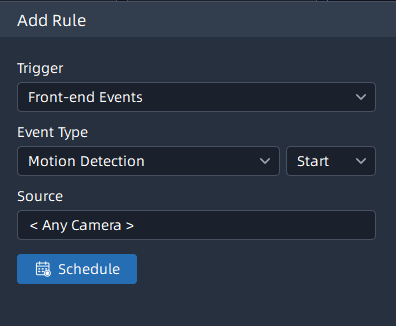 Note: Enable the Motion
Detection of Milesight camera before
using the function. |
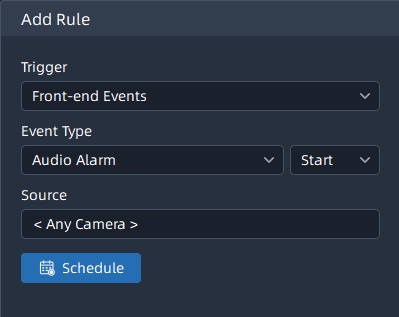
| Front-end Event |
Front-end Audio Alarm: The event trigger setting page is the same as Front-end Motion Detection setting page.
Note: Enable the Audio Alarm of Milesight
camera before using the function.
|
| Front-end Event | Front-end External Input Alarm: The event trigger page is as below. If the selected camera has multiple alarm interfaces, then you can choose a type of Input ID. The default Input ID is Auto Detect. 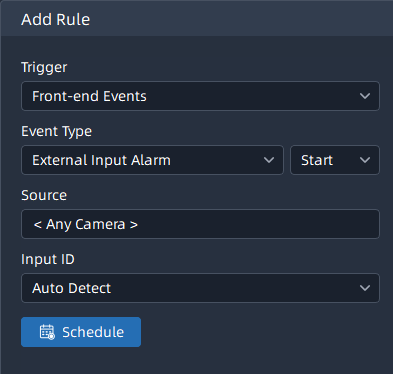 Note: Enable the External Input
Alarm of Milesight camera before using
the function. |
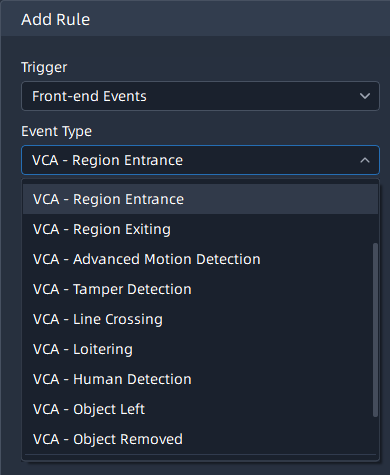
| Front-end Event |
Front-end VCA: You can set different camera sources, schedules and VCA event types here. The page is as below:
Note: Enable the VCA event of Milesight
camera before using the function.
|
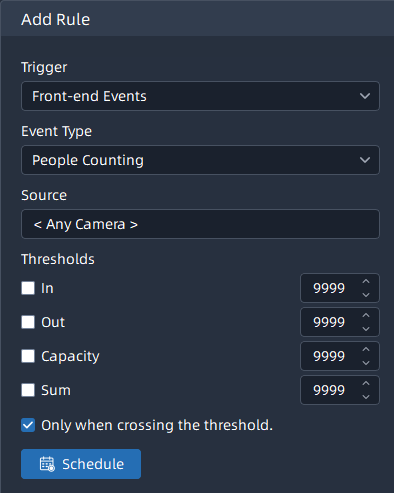
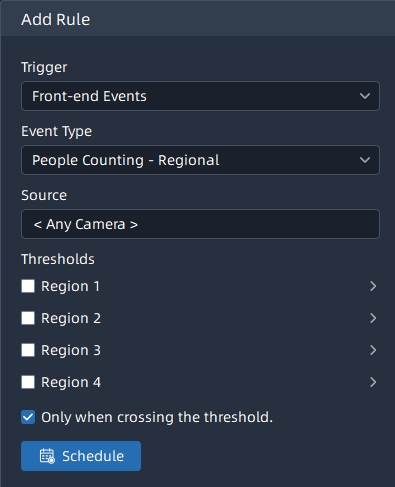
| Front-end Event |
People Counting: Here you can set trigger rule of two modes, including People Counting and Regional People Counting. When the number of people detected exceeds the threshold you set, the event will be triggered. The page is as below:
Note:
|
|
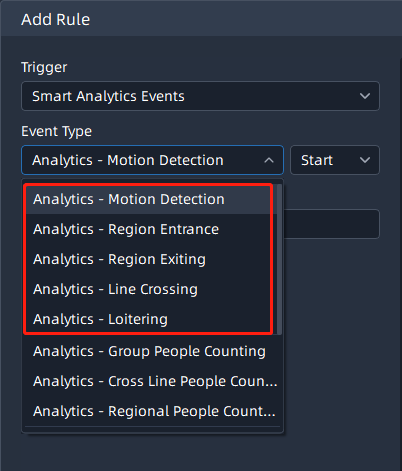
Smart Analytics Events |
Analytics: Here you can set Smart Analytics Events trigger rule of five modes, including Motion Detection, Region Entrance, Region Exiting, Line Crossing and Loitering. You can set different camera sources and schedules here. The page is as below:
|
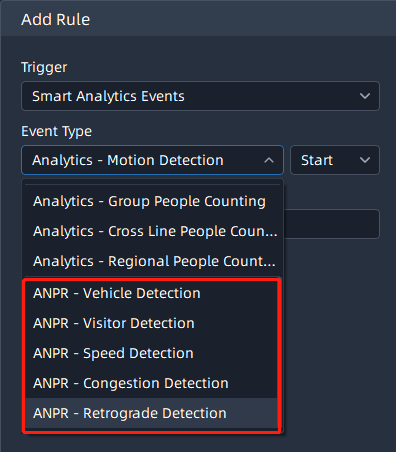
| Smart Analytics Events |
ANPR: Here you can set ANPR trigger rule of five modes, including Vehicle Detection, Visitor Detection, Speed Detection, Congestion Detection and Retrograde Detection. The VMS system will trigger alarm actions according to the configuration rules. The page is as below:
Note: The VMS can only receive license plate
recognition results from Milesight camera.
|
|
Smart Analytics Events |
Face+ Platform: Select the event
trigger type as Face+ Platform, select the face group and the
corresponding camera, set the schedule, and then set the alarm
action.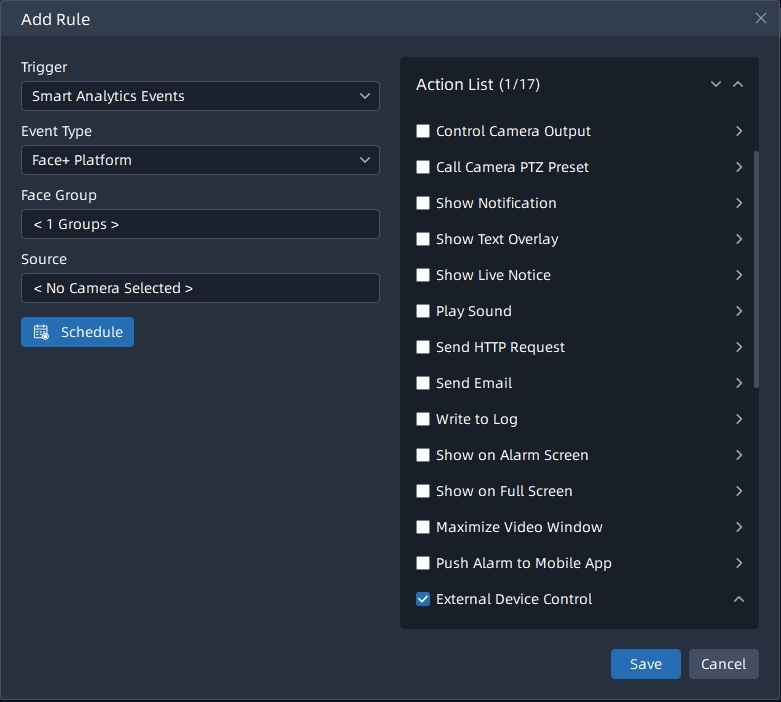 Note: For more information,
please refer to 6.5.4 Face Rule. |
|
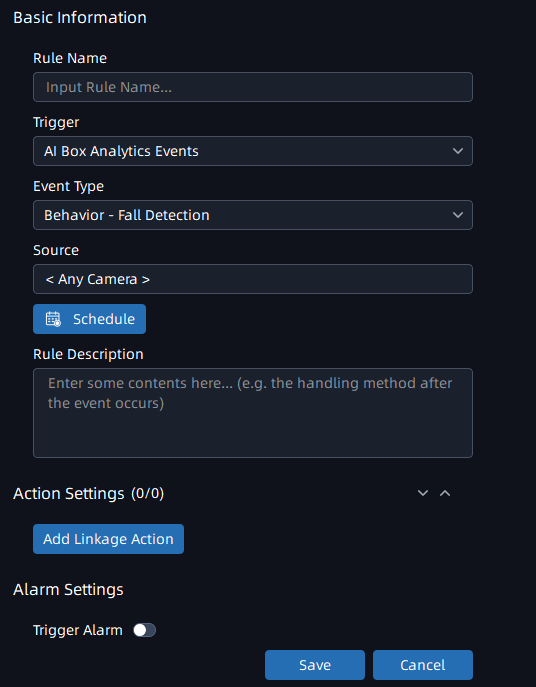
AI Box Analytics Events |
Here you can set Fall Detection and Face Recognition trigger rules. The VMS system will trigger alarm actions according to the configuration rules. The page is as below:
|
|
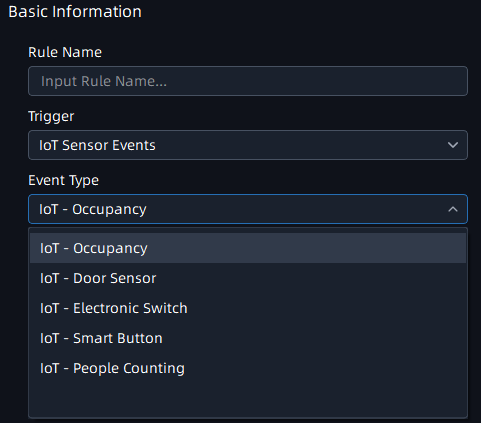
IoT Sensor Events |
IoT: Here you can set IoT Sensor Events trigger rule of five sensors: Occupancy, People Counting, Door Sensor, Electronic Switch and Smart Button. You can set different sensor sources and schedules here. The page is as below:
|
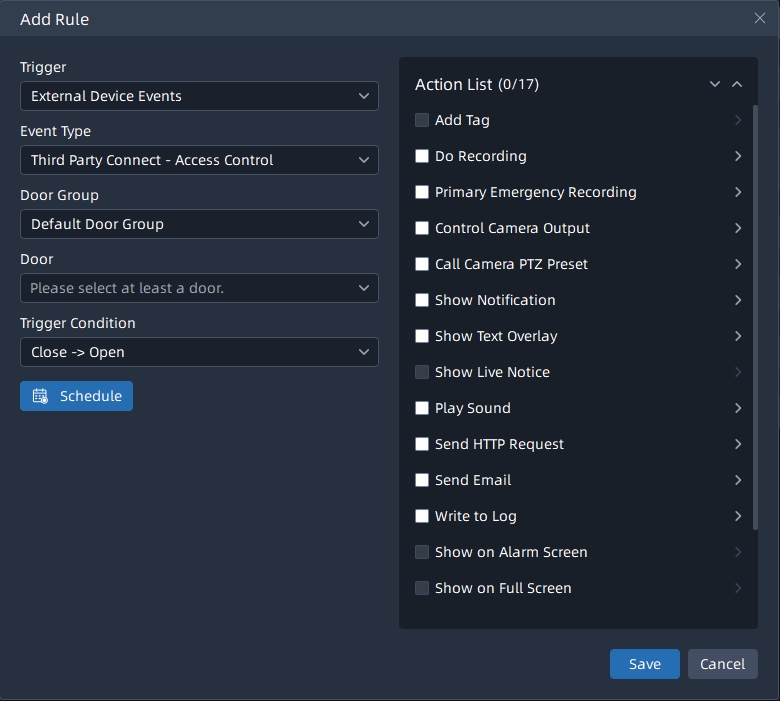
| External Device Event | Third Party Connect - Access Control:
Select the event trigger type as Third Party Connect - Access
Control, select the door group and the corresponding door, select the
trigger condition, set the schedule, and then set the alarm
action.
Note: For more
information, please refer to 6.6.1 Access Control. |
|
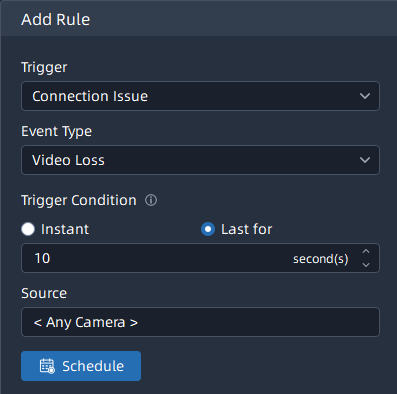
Connection Issue |
Video Loss: You can set Video Loss trigger rule for selected cameras. Once the selected cameras are disconnected beyond the set time, the event rule will be triggered.
|
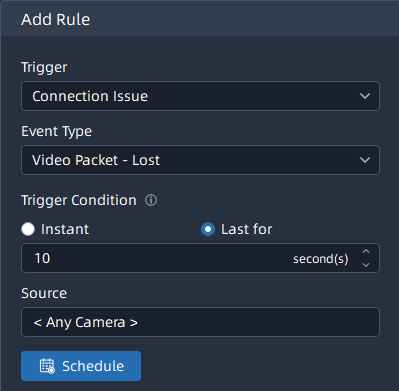
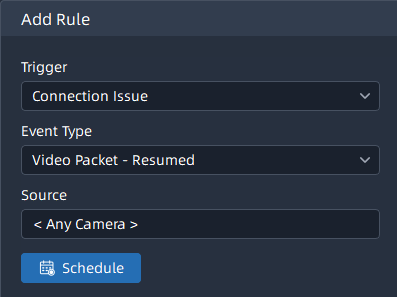
| Connection Issue |
Video Packet: Here you set the event rule as Video Packet Lost or Video Packet Resume.
The Video Packet Lost event will be triggered if the VMS system detects the video packet is lost for more than the set time. The Video Packet Resumed event will be triggered if the VMS system detects the video packet is resumed in the last 1 minute. |
| Connection Issue | Connection Issue: It will trigger an alarm when the camera is offline or online. 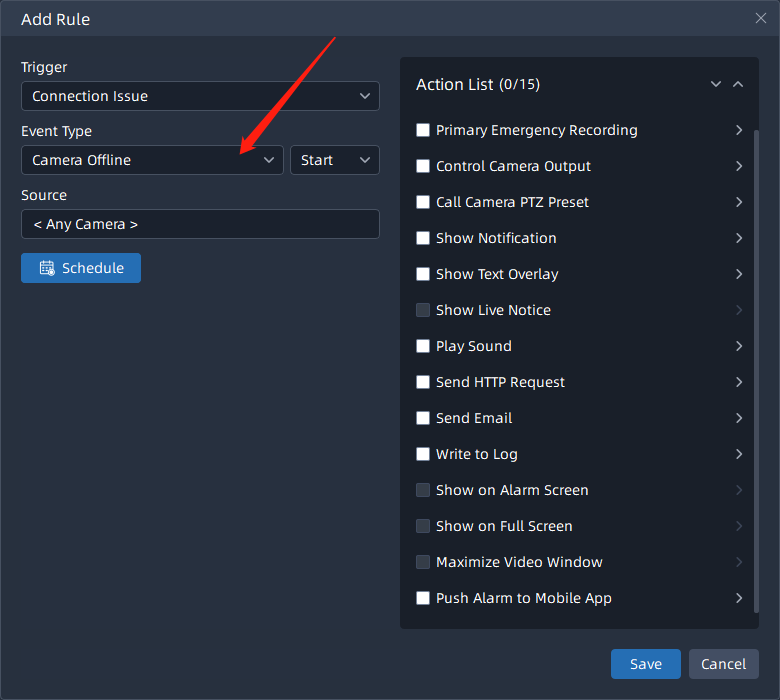 |
|
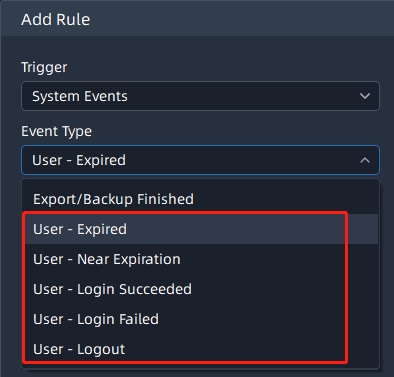
System Events |
Export/Backup Finished:After setting the event rule, the event is triggered when the VMS system finishes data backup or export, like recording video export, system and server configuration export, etc. The page is as below:
|
| System Events |
User Expiration: Here You can set five types of User trigger rule, including Expired, Near Expiration, Login Succeeded, Login Failed and logout. The page is as below:
|
|
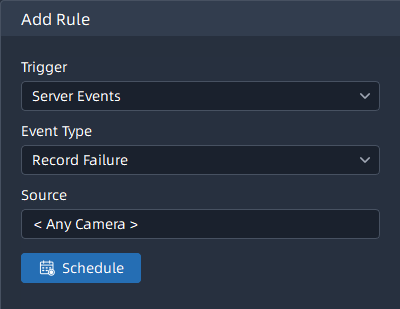
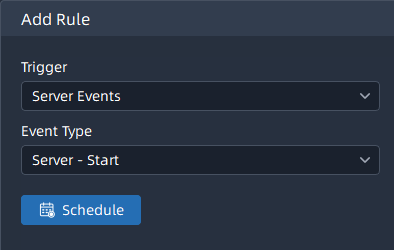
Server Events |
Record Failure: You can set a schedule for the selected cameras, if the selected cameras record failed, then the event will be triggered.
|
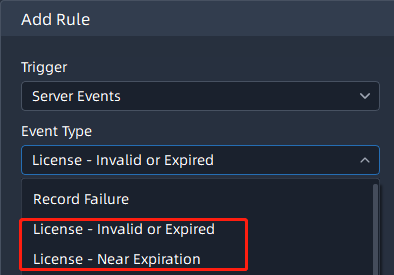
| Server Events |
License Issue: You can set three types of License Issue trigger rule, including Invalid, Expired and Near Expiration. You can set duration for Near Expiration Date if your license is close to expire, then the event will be triggered duration days before Expiration Date.
|
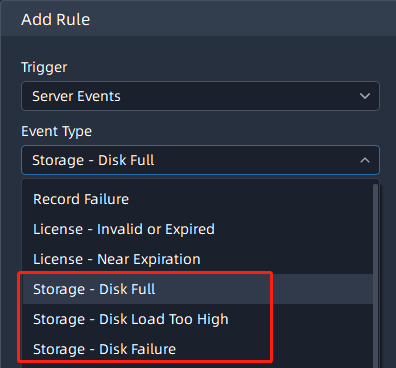
| Server Events |
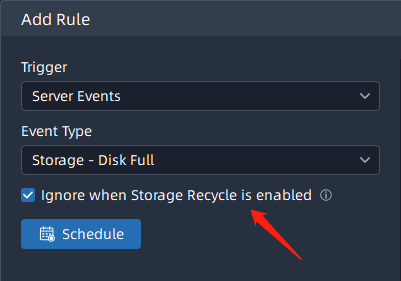
Storage Issue: After setting the event rule, the event will be triggered if the VMS system detects Storage Issue. There are three types of Storage Issue, including Disk Full, Disk Load too High and Disk Failure.
Note: In the settings of the Disk Full event, the user can choose to
mute the alarm when the storage recycle is enabled.
|
|
Server Started: After setting the event rule, the event is triggered if a certain server is started, offline or Conflict in the VMS system. The page is as below:
|
|
| Server Events |
Failover: After setting the event rules, the event will be triggered if the VMS system detects Failover Start Working or Stop Working after Server Recovery.
|
|
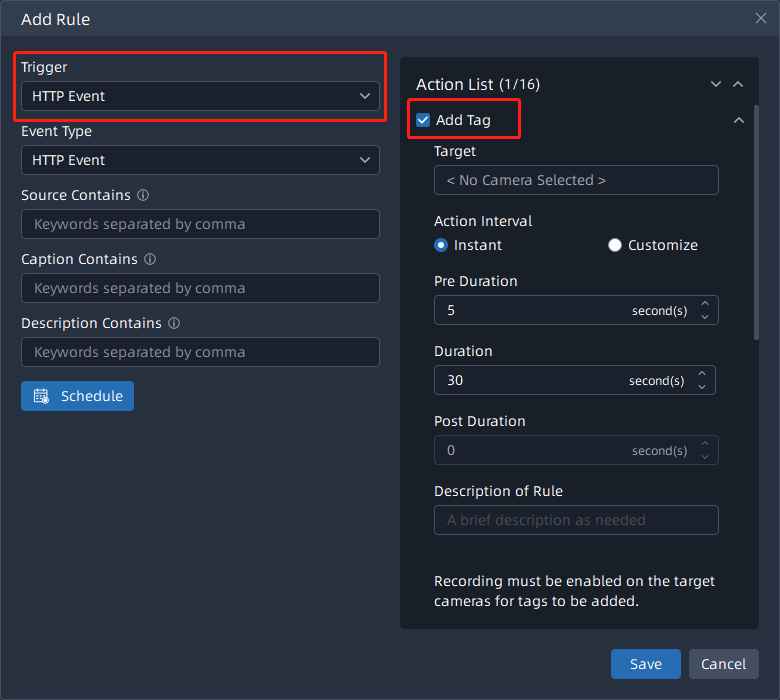
HTTP Event |
HTTP Event: After setting the event rules, the HTTP event will be triggered only if there are matches in the ‘Caption’, ‘Source’, or ‘Description’ with any of the entered keywords if the VMS system receives HTTP push from external devices. The page is as below:
Note: If the field is empty, event will always be triggered.
|
|
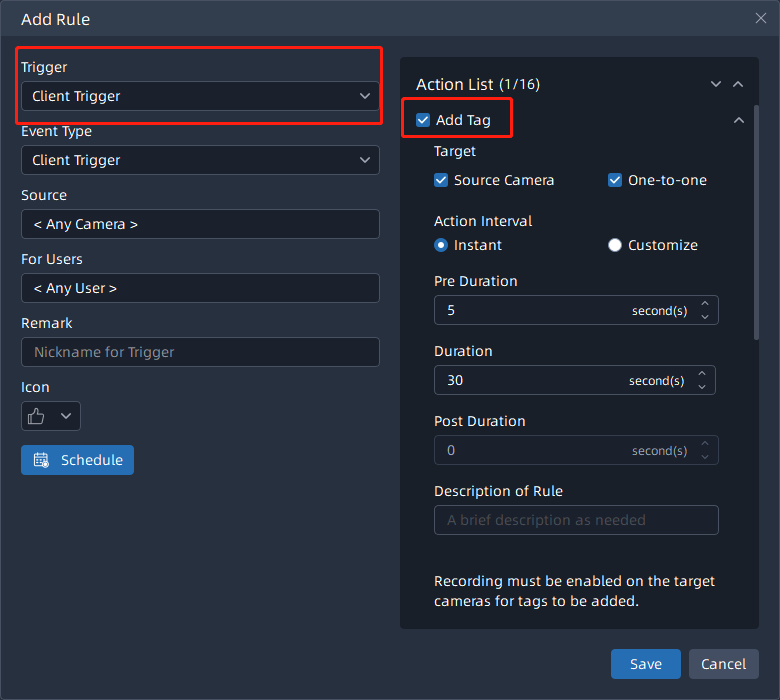
Client Trigger |
Client Trigger: Here you can set trigger icon, users who will be available to use this trigger, remark and trigger schedule for selected cameras. After setting the rule, selected users can see the trigger rule icon and remark in live view window of selected cameras. The page is as below:
|
|
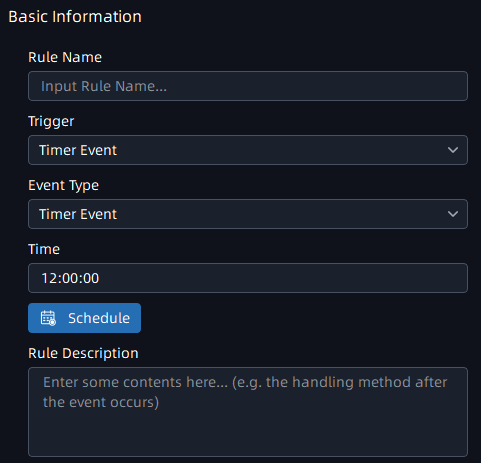
Timer Event |
Timer Event: Here you configure Timer Event to detect anomalies and trigger alarms based on predefined time schedules.
|


The meanings of action settings can be referred to the table below:
|
Parameter |
Function Introduction |
|---|---|
| Action | Add Tag: When the Event Trigger
is set to HTTP Event or Client Trigger, it supports triggering "Add Tag"
to the recording.
Then users can see the tag on the timeline as shown below.
|
| Action |
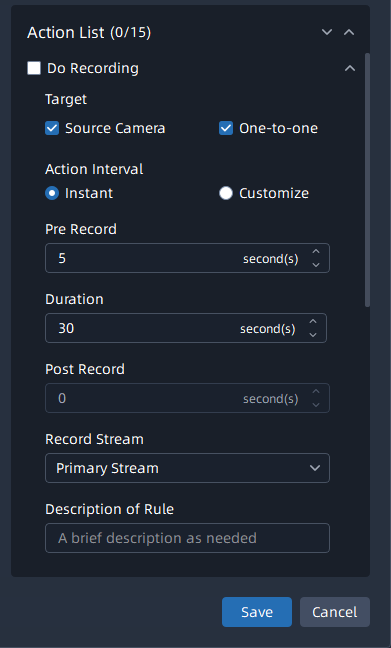
Do Recording: After setting the action rule, the selected target cameras will record video according to the action setting when the corresponded event is triggered. The page is as below:
|
| Action |
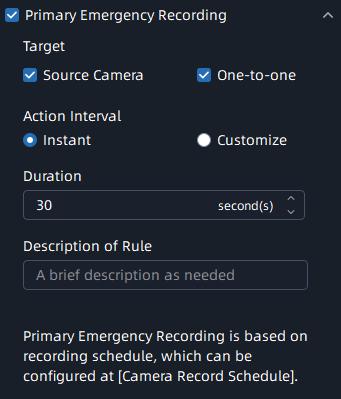
Primary Emergency Recording: After setting the action rule, the selected target cameras will record primary stream video according to the action setting when the corresponded event is triggered. The page is as below:
Note: The targeted devices that is recording the primary stream video
still continue to record primary stream video when related event is
triggered.
|
|
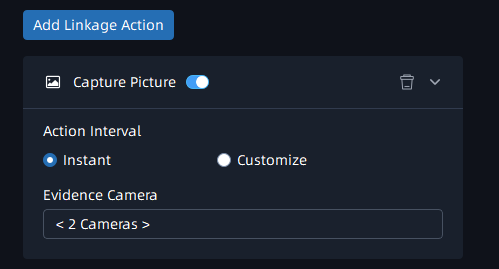
Capture Picture: After setting the action rule, the Source Camera is allowed to trigger snapshots on Evidence Camera. The Page is as below:
Note: Within 2 evidence cameras are supported.
|
|
| Action | Control Camera Output: After setting the action rule, the current output status of selected target camera will change to another one status according to the action setting when the corresponded event is triggered. The page is as below: 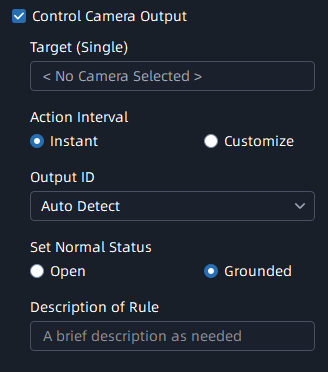 Note: Only one targeted camera
can be selected. If you want more cameras to perform the action, and
you can copy the event rule to configure separately. |
| Action | Call Camera PTZ Preset: After setting the action rule, the selected preset of target camera will be called according to the action setting when the corresponded event is triggered. The page is as below: 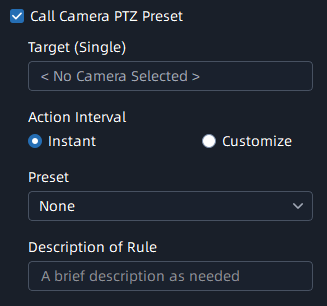 Note: The default target
cameras only display the devices which can support PTZ
function. |
|
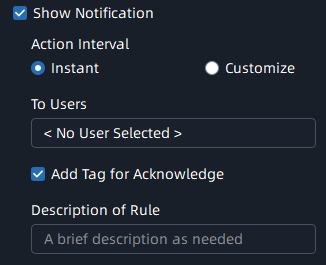
Show Notification: After setting the action rule, the selected users can see the event notification in the notifications panel according to the action setting when the corresponded event is triggered. The page is as below:
Note: Selected users must set to receive the notification in the
Notification Filter, and then can see the event notification in the
notifications panel.
|
|
Show Text Overlay: After setting the action rule, the text overlay which you set will display in the real-time live view window of selected cameras according to the action internal and duration setting when the corresponded event is triggered. Furthermore, you have the option to restrict the visibility of these alarm actions to specific users. The page is as below: 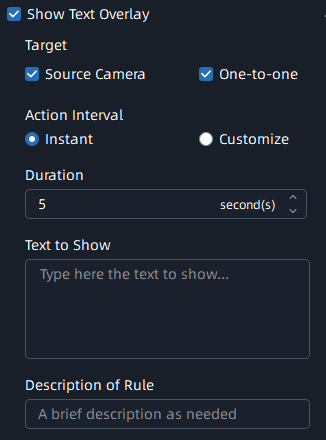 |
|
| Action |
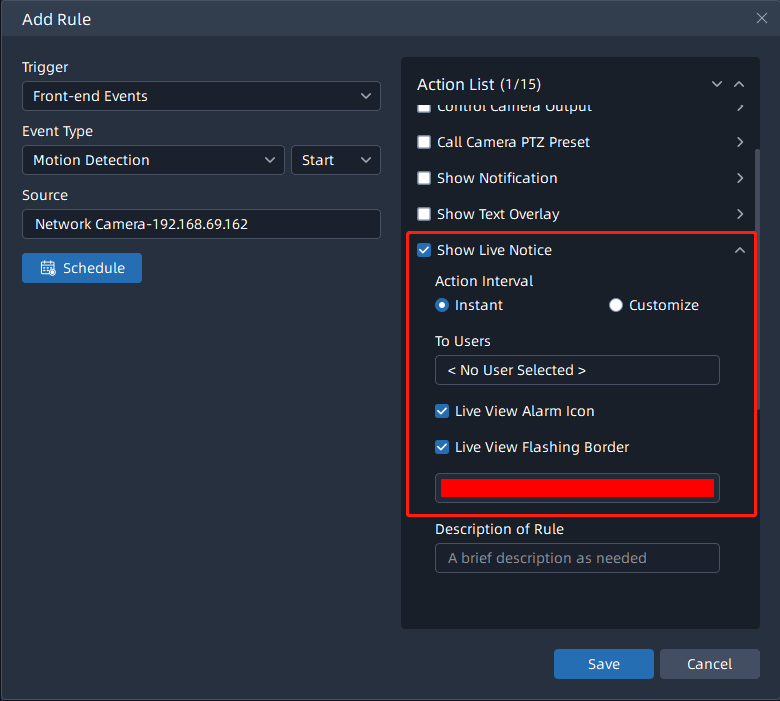
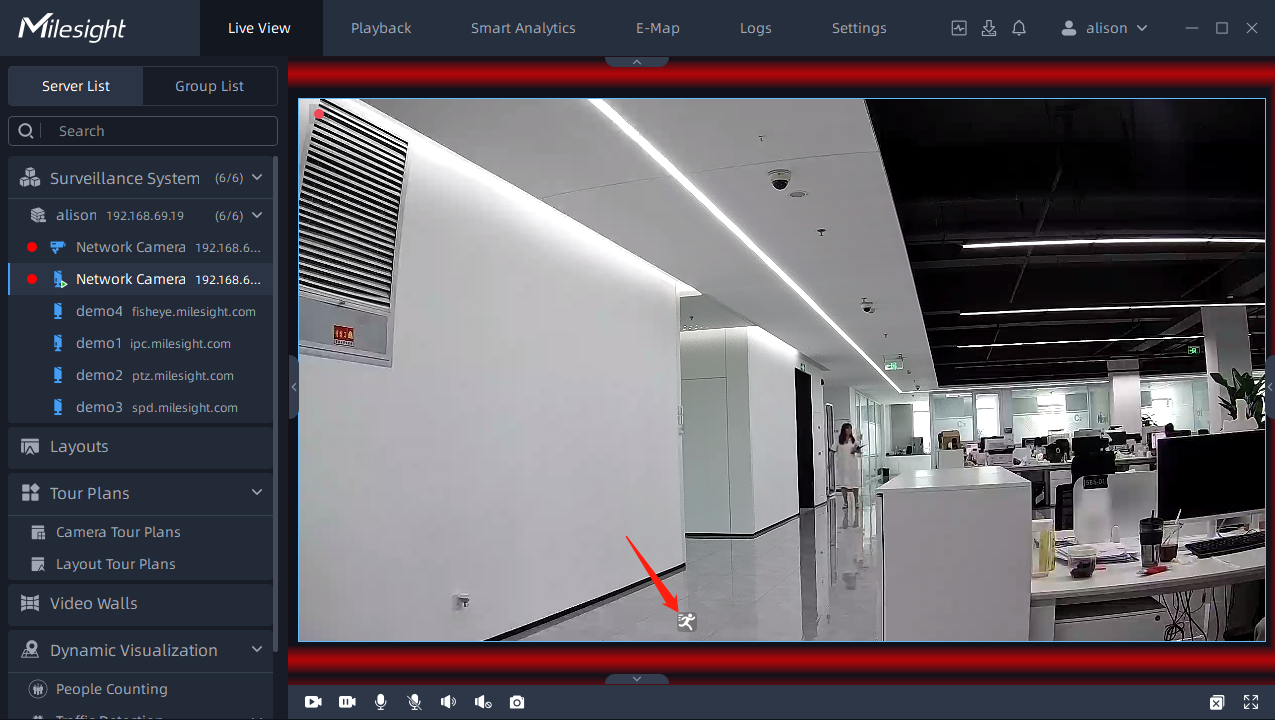
Show Live Notice: Once the event is triggered, it will flash a frame and show the alarm icon on the Live View interface according to the setting, making monitoring more intuitive and efficient. The page is as below:
|
| Action | Play Sound: After setting the action rule, the audio file will play on the client system of selected users when the corresponded event is triggered. Users can choose the built-in audio files in the system or upload the custom audio files manually to meet different needs. The page is as below: 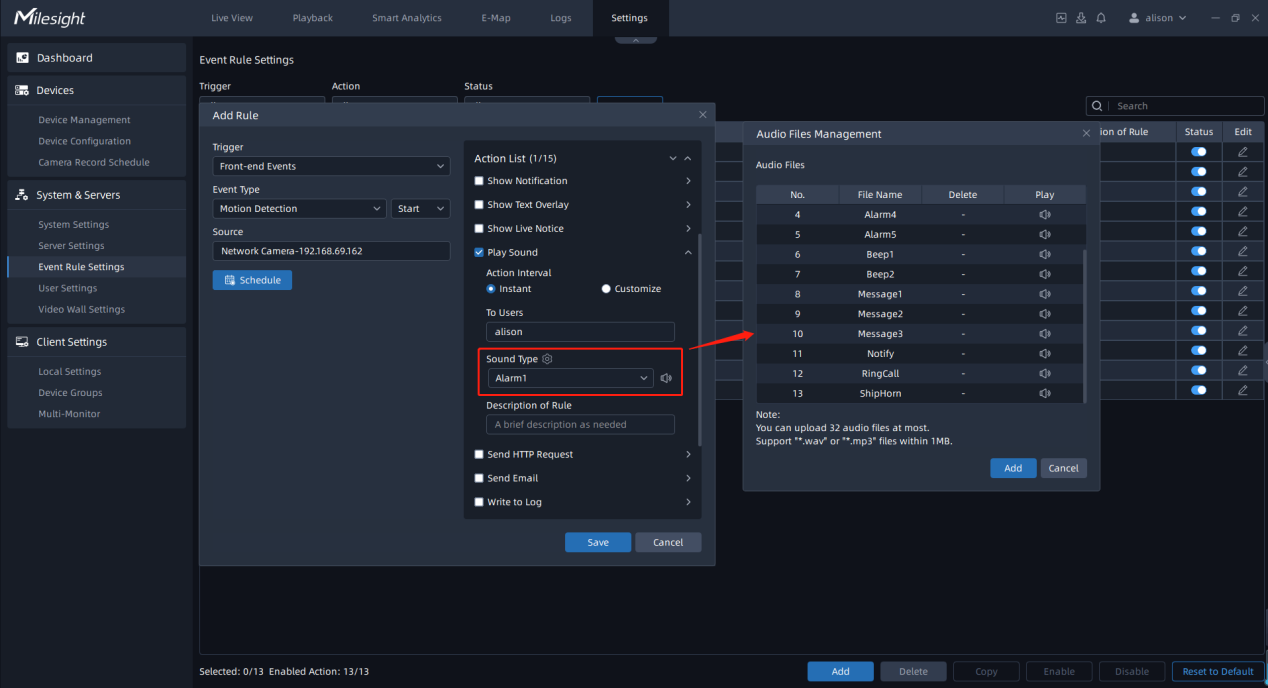 Note: User can upload 32 audio files at most. |
| Action | Send HTTP Request:After setting the action rule, the VMS system will send HTTP Request to the URL filled in the box when the corresponded event is triggered. The page is as below: 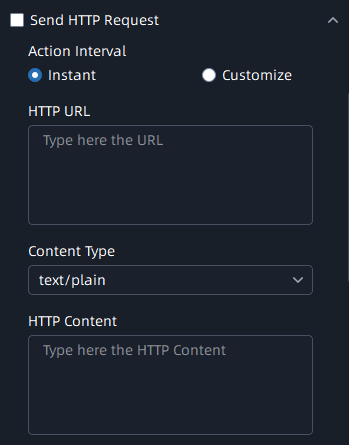 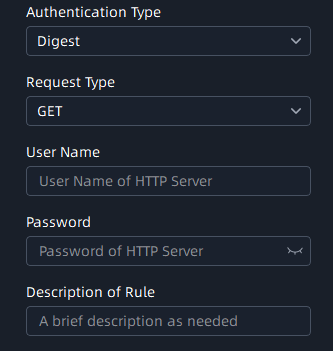 Note: The HTTP URL format can be
customized,for
example,http://{ip}:{port}/api/httpEvent?xxxxxx |
| Action | Send Email: After setting the action rule, the VMS system will send the event emails including trigger, event source and time, etc., to the selected users and other recipients which you set when the corresponded event is triggered. The page is as below: 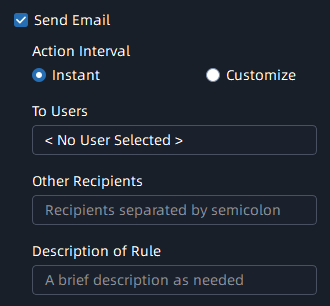 Note: Email Service needs to be
configured correctly. |
Write to Log: After setting the action rule, the VMS system will write the information about event to event logs when the corresponded event is triggered. The page is as below: 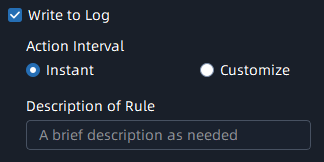 |
|
| Action |
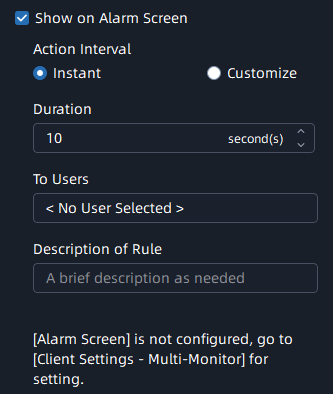
Show on Alarm Screen: After setting the action rule, the VMS system will push the live view of camera to display on Alarm Screen while action is triggered. The page is as below:
Note: ‘Alarm Screen’ need to be configured firstly.
|
| Action |
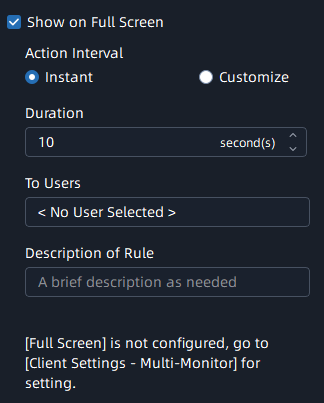
Show on Full Screen: After setting the action rule, the VMS system will push the live view of camera to display on Full Screen while action is triggered. The page is as below:
Note: ‘Full Screen’ must be configured firstly.
|
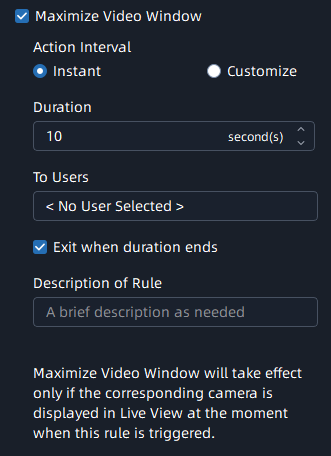
| Action |
Maximize Video Window: After the action rule is set, the VMS system will maximize the live view of camera on the current video window while action is triggered. The page is as below:
Note:
|
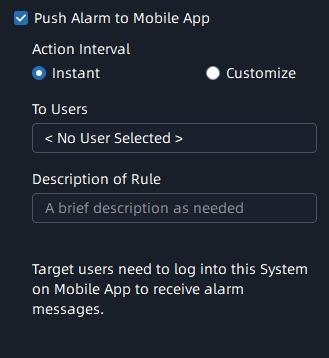
| Action |
Push Alarm to Mobile App: After the action rule is set, the VMS system will push alarm message to M-VMS Mobile App. The page is as below:
Note: Please make sure the version of M-VMS
Mobile App is V1.0.0.2 or above.
|
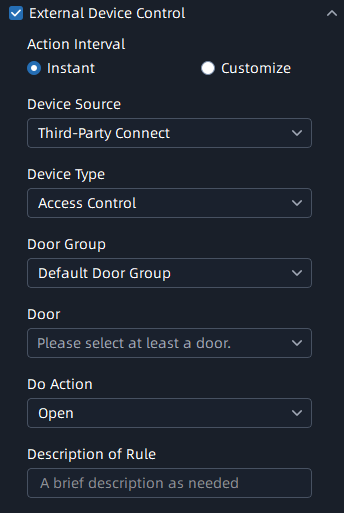
| Action | External Device Control: If you
have added an access control device, it supports triggering the door
opening or closing according to different event trigger types to achieve
access control management.
|

Step 5: Enable Trigger Alarm. When you enable it, then the Alarm Data will be generated in the Alarm Center