Device
This chapter describes how to add and manage devices.
Add Devices
- Add a Device Manually
- Batch Import Devices
- Add LoRaWAN® Devices by Scanning
- Add BACnet Devices by Scanning
- Add Milesight LoRaWAN® Devices by NFC
- Add a Device Manually
-
- On the left bar, select Data Service > Data
Acquisition page.
- On the top bar, select Device tab.
- Click +Manually Add to add a new device.
- Configure the basic information of the device.

Parameter Description Device Name Define a unique name for the device. Protocol Type Select the protocol type according to the terminal devices: LoRaWAN, BACnet/IP, BACnet MS/TP, Modbus RTU, Modbus TCP, Modbus RTU over TCP, KNX/TP. Device Model Select a device model from Device Library. If the device does not have a compatible model or requires custom configurations, select None. Tip: Only when a device model is selected can the device select objects in the next step.Device Access Network Select the device access network added from Device Access Network. Description For noting this device. Protocol Type is LoRaWAN Device EUI The unique 16-digit hexadecimal EUI of the device. Device-Profile Select the device profile added from Device Profiles. Note: If the device type is Class B, ensure Class B Setting is enabled.fPort FPort (Frame Port) is a single-byte field in the MAC payload that identifies the type or destination of the data, functioning like a port number for different services or applications on an end device. Modbus RTU Data Transmission Choose from: Disable, Modbus RTU to TCP, Modbus RTU over TCP. This is only applicable to Milesight LoRaWAN® controllers. (UC501/UC300, etc.) Modbus RTU to TCP: The TCP client can send Modbus TCP commands to request Modbus data from the controller.
Modbus RTU over TCP: The TCP client can send Modbus RTU commands to request Modbus data from the controller.Modbus RTU Port When Modbus RTU Data Transmission is not Disable, enter the port used by the Milesight LoRaWAN® controller's Modbus RS485 bridge LoRaWAN feature. TCP Port When Modbus RTU Data Transmission is not Disable, enter the port for data transmission between the TCP client and this gateway. Application Key When join type is OTAA, set the 32-digit hexadecimal AppKey value. For Milesight devices, users can select Default to use Milesight default AppKey or Custom to customize the AppKey.
Activation Settings When join type is ABP, users can select Default to use default parameters for Milesight devices, or Custom to customize the parameters. Device Address When the join type is ABP, set the 8-digit hexadecimal DevAddr. Application Session Key When the join type is ABP, set the 32-digit hexadecimal NwkSKey value. Network Session Key When the join type is ABP, set the 32-digit alphanumeric AppSKey value. Uplink Frame-counter When the join type is ABP, set the uplink frame-counter. Downlink Frame-counter When the join type is ABP, set the downlink frame-counter. Timeout The time to judge the device’s online/offline status. Range: 1-4320 mins Frame-counter Validation Enable this feature to prevent replay attacks. Protocol Type is BACnet/IP or BACnet MS/TP Device Instance Nr Set the unique identifier of the device within the BACnet network. Protocol Type is Modbus TCP or Modbus RTU over TCP IP Address Set the IP address of the Modbus server (slave) device. Server ID Set the unique server ID (slave ID) provided by Modbus device vendor. Port Set the port of the Modbus server (slave) device. Protocol Type is Modbus RTU Server ID Set the unique server ID (slave ID) provided by Modbus RTU device vendor. Protocol Type is KNX/TP Physical Address Set the unique physical address of the device within the KNX bus network. - Click Next Step to select objects for this device.
If no device model is selected, there will be no object to select, and the device will be created automatically.
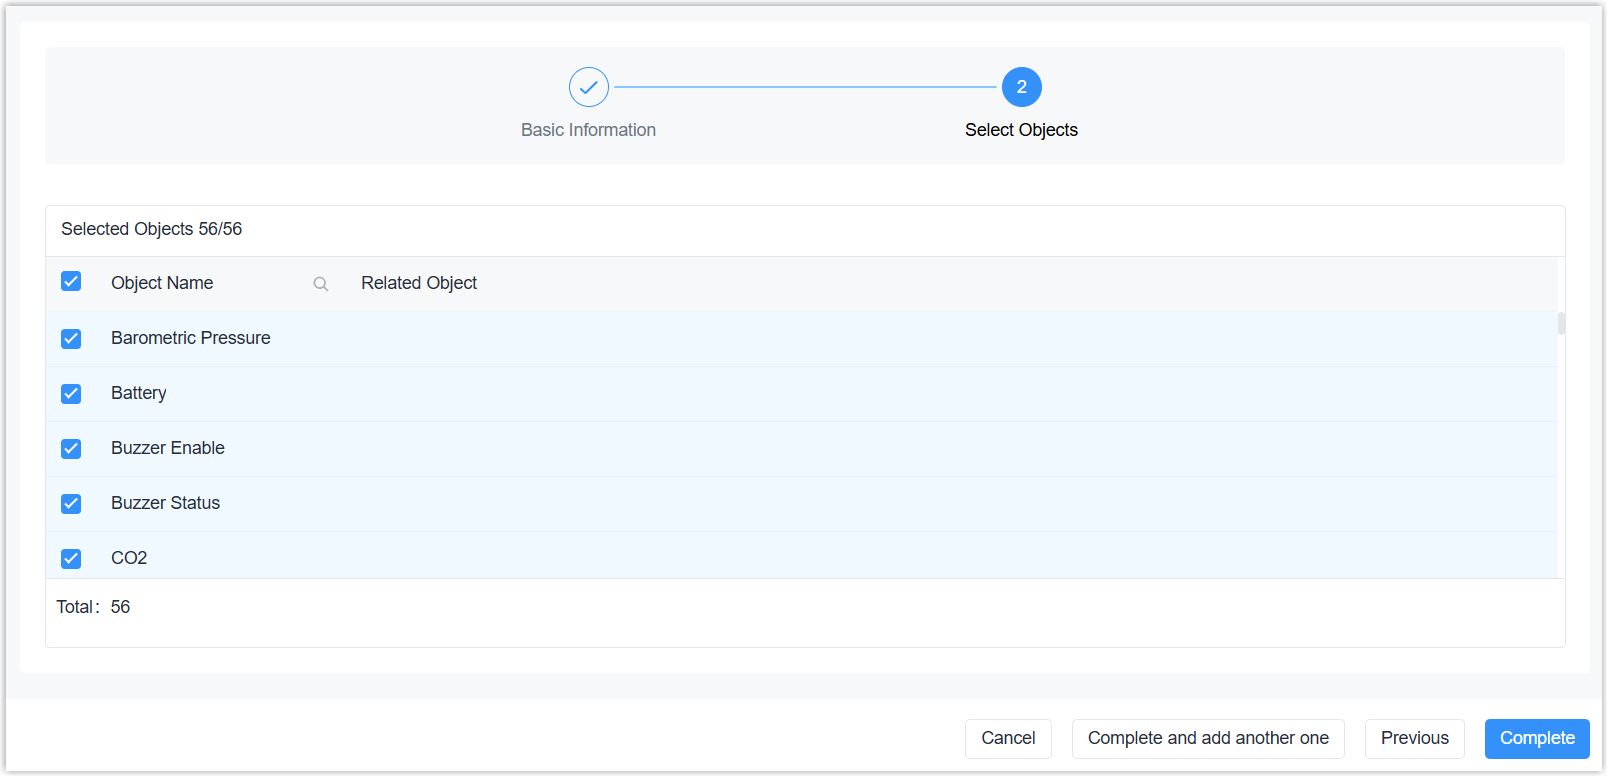
If the device model is selected in previous step,- Select the required objects to add to the device.
- Click Complete to finish adding the device,
or click Complete and add another one to add
a new device.
- On the left bar, select Data Service > Data
Acquisition page.
- Batch Import Devices
-
- On the left bar, select Data Service > Data
Acquisition page.
- On the top bar, select Device tab.
- Click Batch Import.
- Upload a file that contains the device information.

- Select the protocol used to identify the devices.
- Select the upload file type.
- Download the template file, and fill in the information. You can also get the file by clicking Batch Export from another gateway with added devices.
- Upload the file.
- Click Next Step.
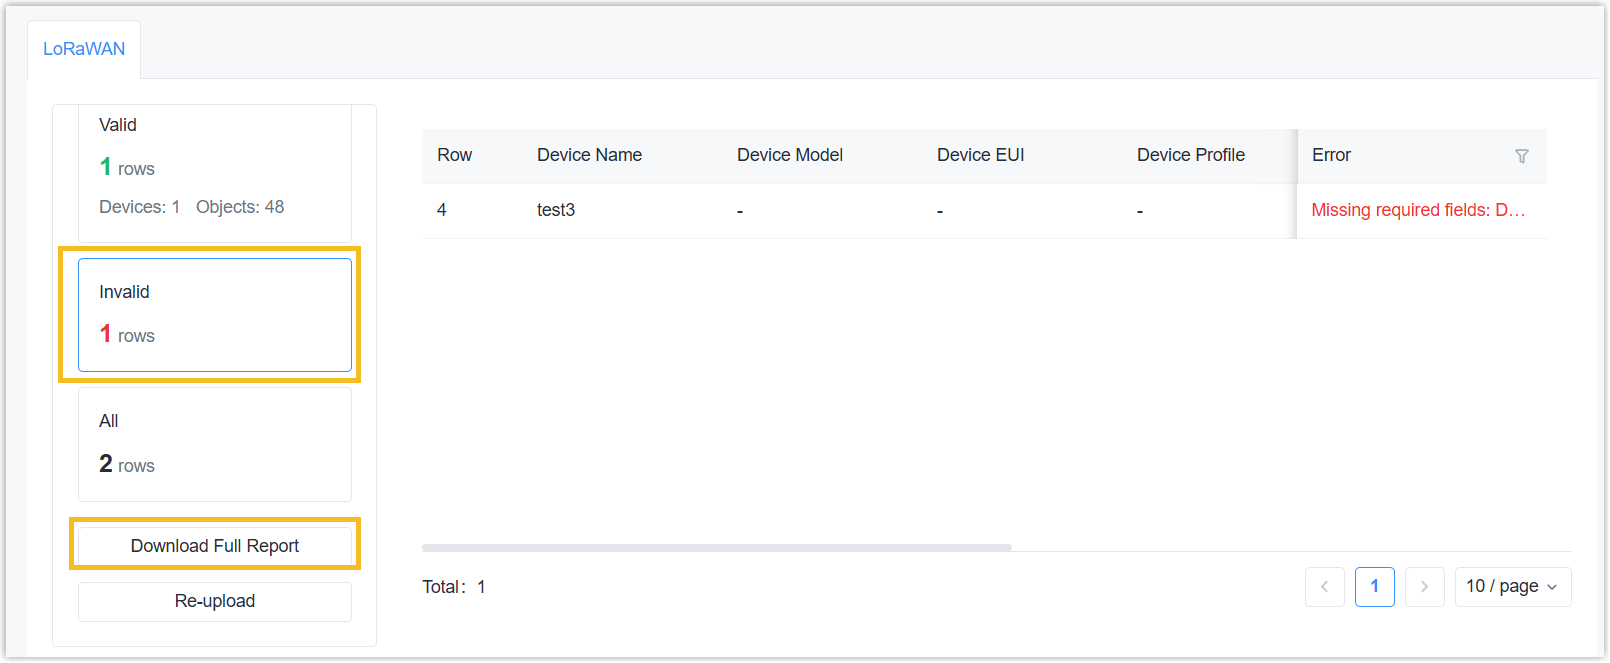
- Check the import result. If the import is successful, click the number in the Related Objects column to select objects. By default, all objects are selected.If the import failed, click the Invalid tab on the left or download the full report to check the reason for the error and re-upload the file.
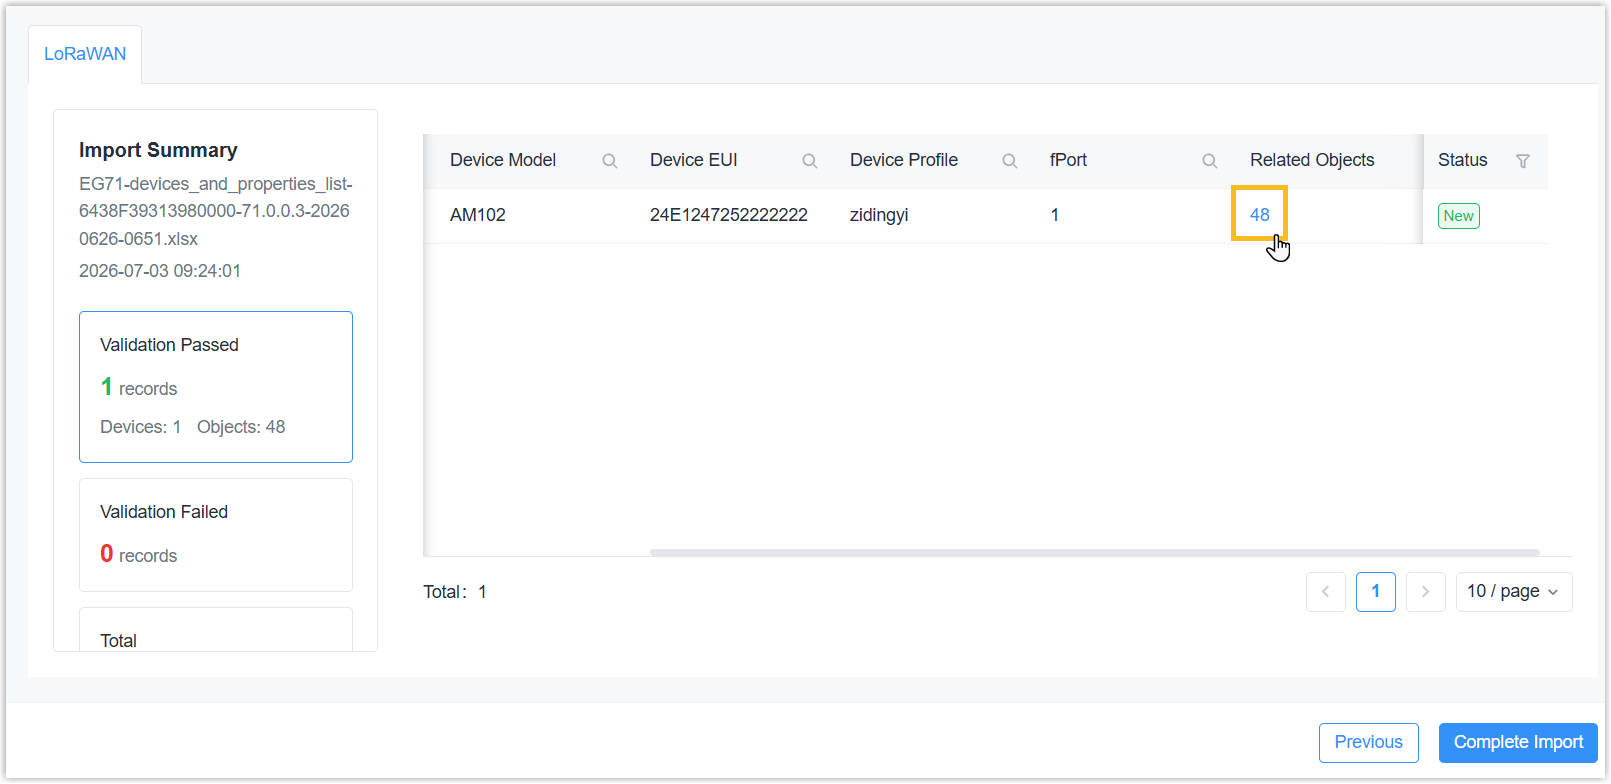
- Click Confirm Import to complete the addition. The gateway will add the devices with selected objects.
- On the left bar, select Data Service > Data
Acquisition page.
- Add LoRaWAN® Devices by Scanning
-
- On the left bar, select Data Service > Data
Acquisition page.
- On the top bar, select Device tab.
- Click +Scan to Add, select Scan LoRaWAN.
- Add the AppKey values for searching the target OTAA devices. If
using Milesight devices, enable Milesight Default AppKey
directly.
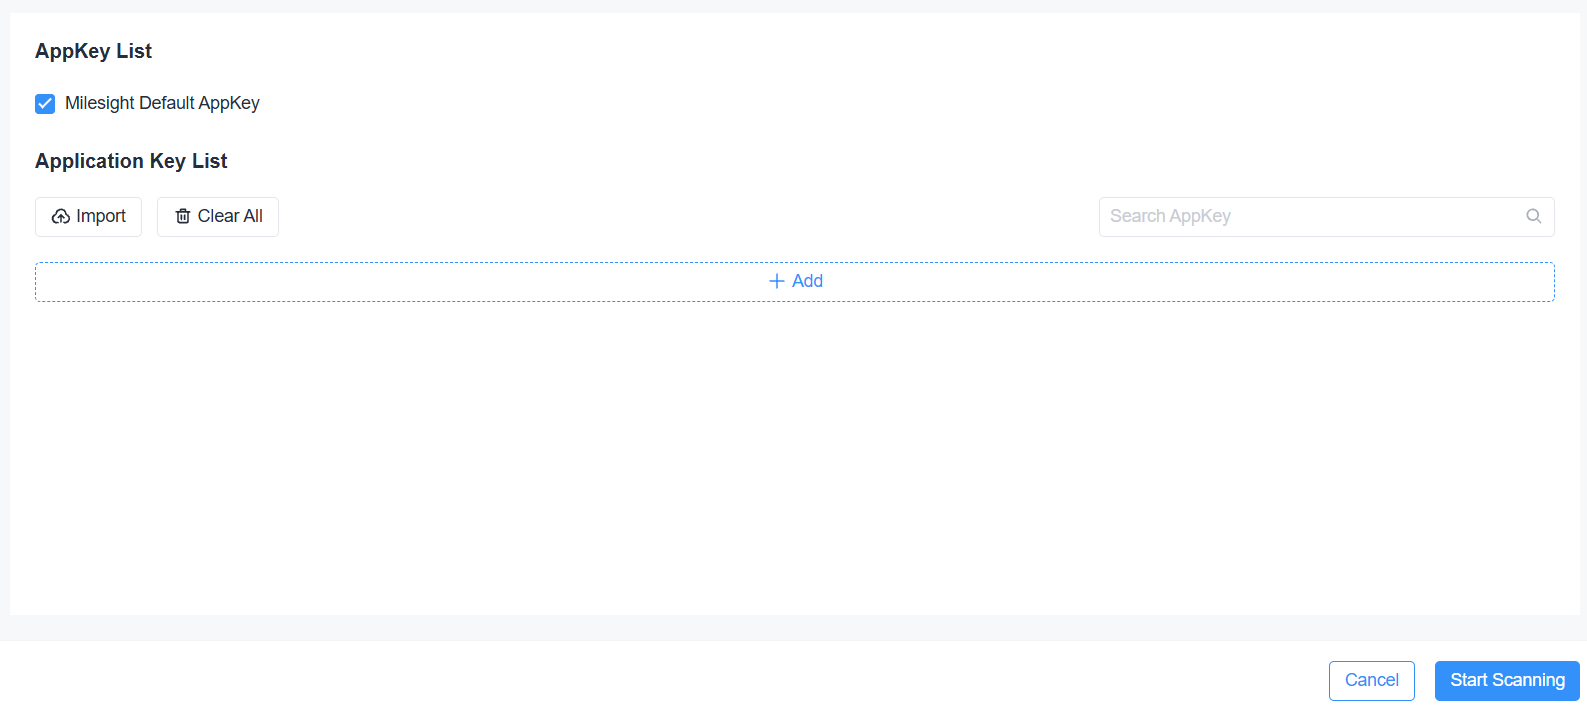
- Click Start Scanning.
- In the Operation column, click Edit to edit the parameters of the desired device (s), or click Ignore to ignore the device.
- Add desired devices to the gateway.
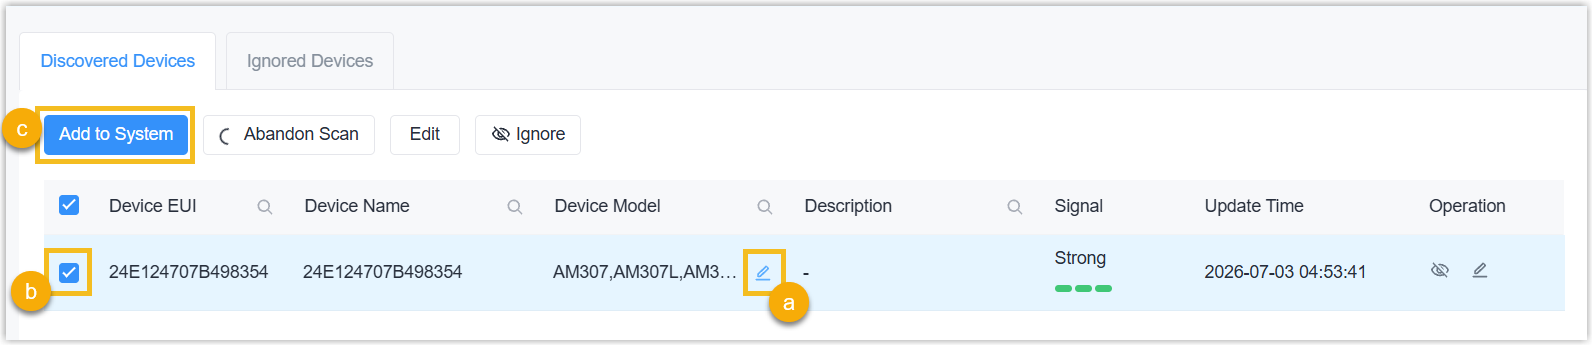
- Select one device model if a device matches multiple models.
- Check the boxes of the target device (s),
- Click Add to System.
- Click Abandon scan to stop scanning and go back to device list.
- On the left bar, select Data Service > Data
Acquisition page.
- Add BACnet Devices by Scanning
-
- On the left bar, select Data Service > Data
Acquisition page.
- On the top bar, select Device tab.
- Click +Scan to Add, select Scan BACnet/IP or Scan BACnet MS/TP.
- Select the access network, and configure the device instance
number range to scan. Note: Ensure the physical or network interface of this access network can reach your BACnet devices.

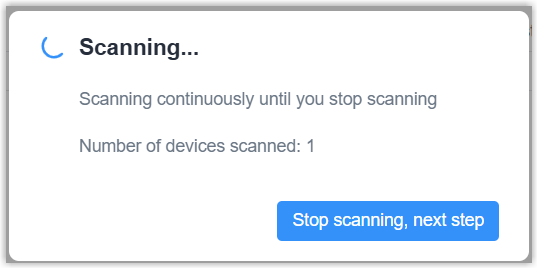
- Click Next Step to start scanning the reachable BACnet devices in the network.
- If there is any device can be scanned, click Stop scanning,
next step.
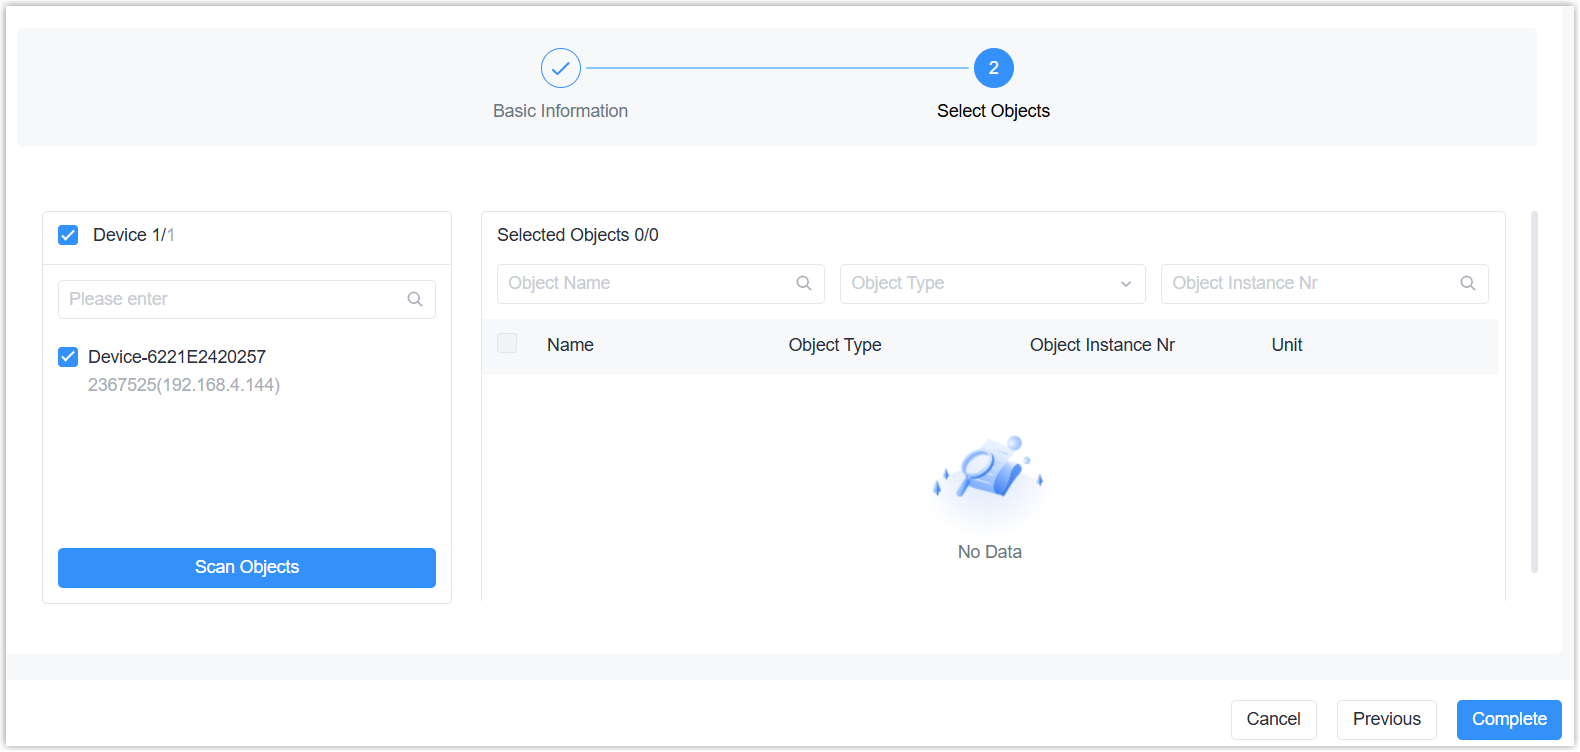
- Select the device from the device list, click Complete to
finish adding it, or click Scan Objects to search for and
add the objects for the device.
- On the left bar, select Data Service > Data
Acquisition page.
- Add Milesight LoRaWAN® Devices by NFC
-
Prerequisites:
- The end device supports NFC configuration.
- The end device and the gateway support the same LoRaWAN® channel plan.
Steps:
- Power on the end device.
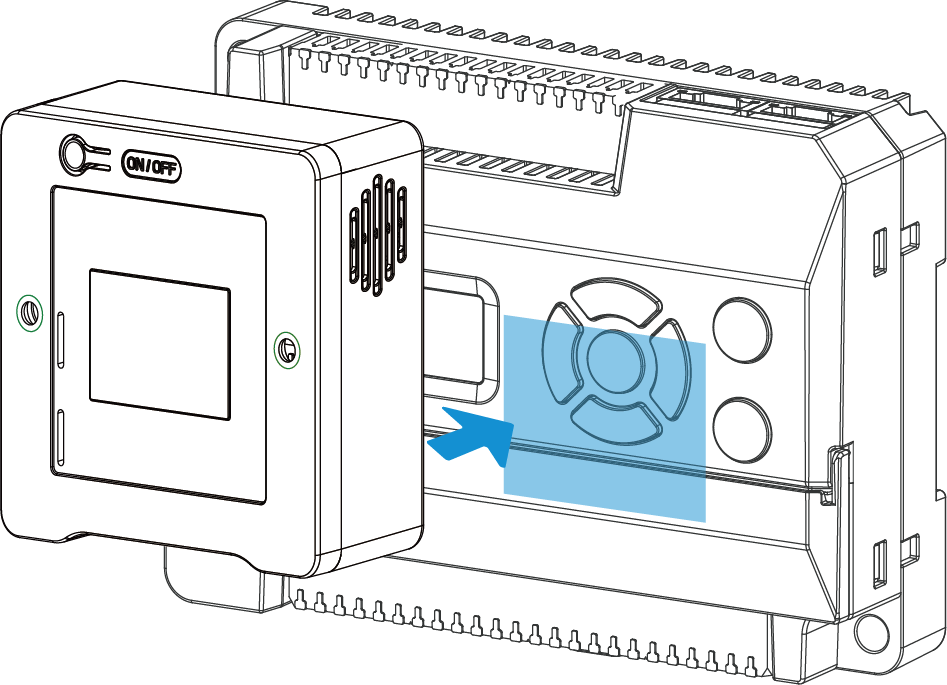
- Press any screen button on the gateway to activate the gateway screen.
- Attach the NFC area of the end device to the gateway for a few
seconds. The screen will display the adding status and
the
NFC LED will quickly blink. If added
successfully, the NFC LED will stay on for 3 seconds, and the
device will display in the device list.
- Click
 of the added device to select the device
model.
of the added device to select the device
model.
View Device Status

| Status | Description |
|---|---|
| Online | The gateway receives data with timeout or keep alive interval. |
| Offline | The gateway does not receive data for more than timeout or keep alive interval. |
| Never Activated | The gateway does not receive any data after creation. |
| Join Failed | Failed to join the network for LoRaWAN® devices. Move the mouse to this status to check the failure reason. |
Add Device Objects
- Add Objects from Device Library
- Prerequisites: A device model has been selected for the
device.Steps:
- On the left bar, select Data Service > Data
Acquisition page.
- On the top bar, select Device tab.
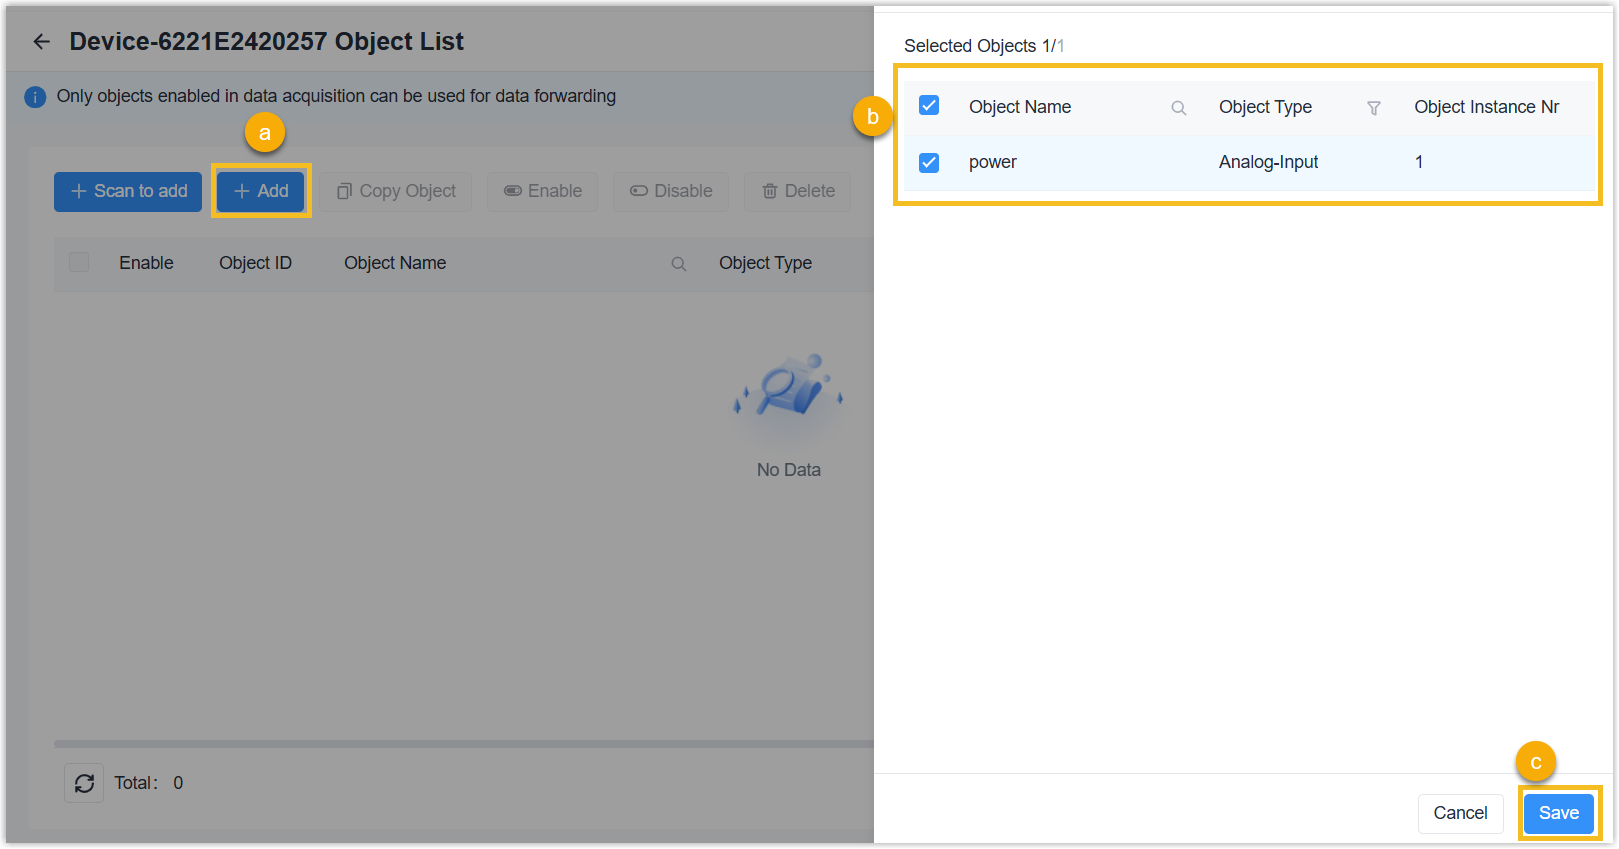
- Select the desired device, then click
the object count value to navigate to the Object List
page.

- Click +Add and select Device Library.
- Select the objects from the pop-up list, click
Save.
- Click edit in the
Object List to configure the object parameters (collection
interval, linear function, etc.) as required.
- On the left bar, select Data Service > Data
Acquisition page.
- Add Objects Manually
- If you need to add custom objects, please follow the steps below. Note: LoRaWAN® devices do not support this feature.
- On the left bar, select Data Service > Data
Acquisition page.
- On the top bar, select Device tab.
- Select the desired device, then click
the object count value to navigate to the Object List
page.
- Click +Add and select Custom Objects.
- Configure the object information according to the protocol
type.
Parameter Description Object Name Define a unique name for this object. Object Description For noting this object. BACnet/IP or BACnet MS/TP Object Type Select BACnet object type. Object Instance Nr Set a unique object instance number. Collection Interval The interval to collect the object data. Range: 1-86400s. Unit Select the value unit when object type is Analog type. Linear Function When enabled, the collected value will be substituted into the function formula before being display. The formula: y=a*x+b(y: present value, x: raw value/real collected value)
COV Subscription When enabled, the gateway will send a notification when analog-type value changes. Modbus RTU/TCP or Modbus RTU over TCP Register Type Select the Modbus register type. Discrete Input: Reads on/off values
Coil: Reads/Writes on/off values
Input Register: Reads measurements and statuses
Holding Register: Reads/Writes configuration valuesData Format Select the data type when register type is Input Register or Holding Register. Register Address Set the start address for reading/writing this object's value in the register. Register Quantity Displays the quantity based on the data format. Collection Interval The interval to collect the object data. Range: 1-86400s. Unit Select the unit of this value when register type is Input Register or Holding Register. Linear Function When enabled, the collected value will be substituted into the function formula before being display. The formula: y=a*x+b(y: present value, x: raw value/real collected value)
KNX Group Address Define the group address of this object. Datapoint Type Select the KNX Data Point Type (DPT) to define the value. If the type is Custom, you need to define the data length. Access Mode Select the access mode for this object. Collection Interval The interval to collect the object data. Range: 300-86400s. Unit Displays the data unit after selecting the datapoint type. - Click Save to save the settings.
- On the left bar, select Data Service > Data
Acquisition page.
- Add BACnet Objects by Scanning
-
- On the left bar, select Data Service > Data
Acquisition page.
- On the top bar, select Device tab.
- Select the desired device, then click
the object count value to navigate to the Object List
page.
- Click +Scan to add to scan for objects of this BACnet device.
- Select the desired objects from pop-up list, then click
Save.

- On the left bar, select Data Service > Data
Acquisition page.
- Add Objects by Copy
- If you add multiple devices of the same model, follow the steps below to
add objects by copying.Note: KNX devices do not support this feature.
- Follow the steps above to add objects to one of the devices.
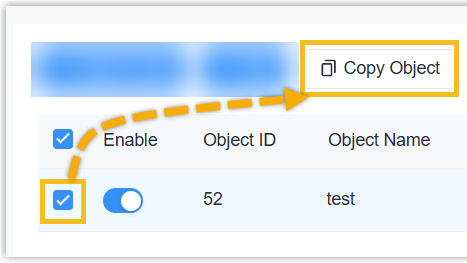
- Select the device with the added objects in the device list, click the object count value to go to Object List page.
- Select the checkboxes of the desired objects, then click Copy
Object.
- In the pop-up window, select the copy type, and the
devices.
Overwrite: The objects of the selected devices will be overwritten.
Add: The objects of the selected devices will not be overwritten.
- Click Save to copy the objects to the selected devices.
Enable or Disable Objects
- On the left bar, select Data Service > Data
Acquisition page.
- On the top bar, select Device tab.
- Select the desired device, then click
the object count value to navigate to the Object List
page.
- Enable or disable the objects. After enabled, the objects can be used for
data forwarding and read/write operations.Enable or disable single object: Tap the Enable button for the desired object.
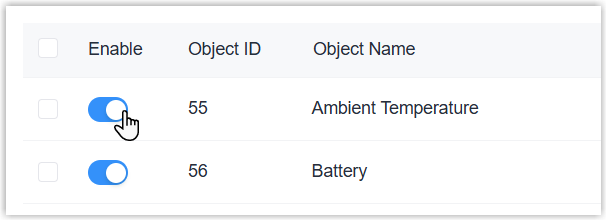 Enable or disable objects in bulk: Select the checkboxes of the desired objects, then click Enable or Disable button.
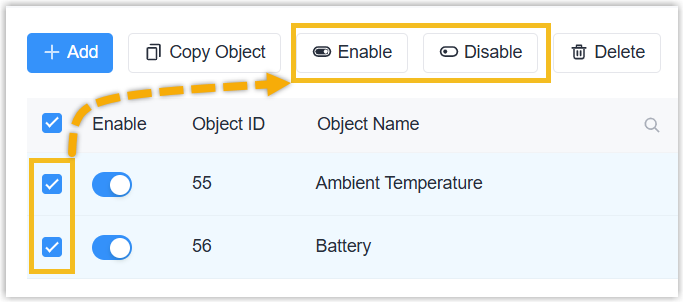
Read/Write Devices
The gateway supports reading device data or send commands to devices directly.
- The device is online.
- The desired device object is writable.
- If the LoRaWAN® device is of Class B type, ensure Class B Setting is enabled.
- Send Command to a LoRaWAN® Device
-
- On the left bar, select Data Service > Data
Acquisition page.
- On the top bar, select Device tab.
- Select the desired device, click
 to configure a downlink
payload.
to configure a downlink
payload.
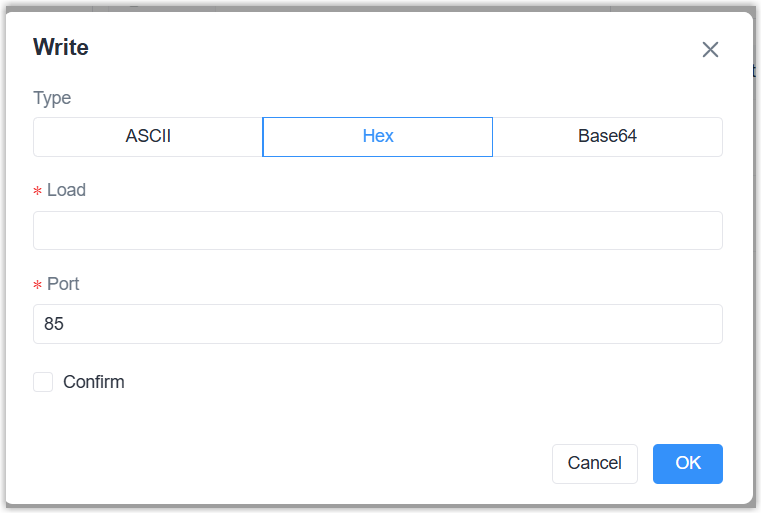
Parameter Description Type Select the downlink payload type. Load Define the downlink payload based on the corresponding type. Port Define the application port for this device. Confirm Enable or disable the device to respond after receiving this downlink payload. - Click OK to send the downlink payload.
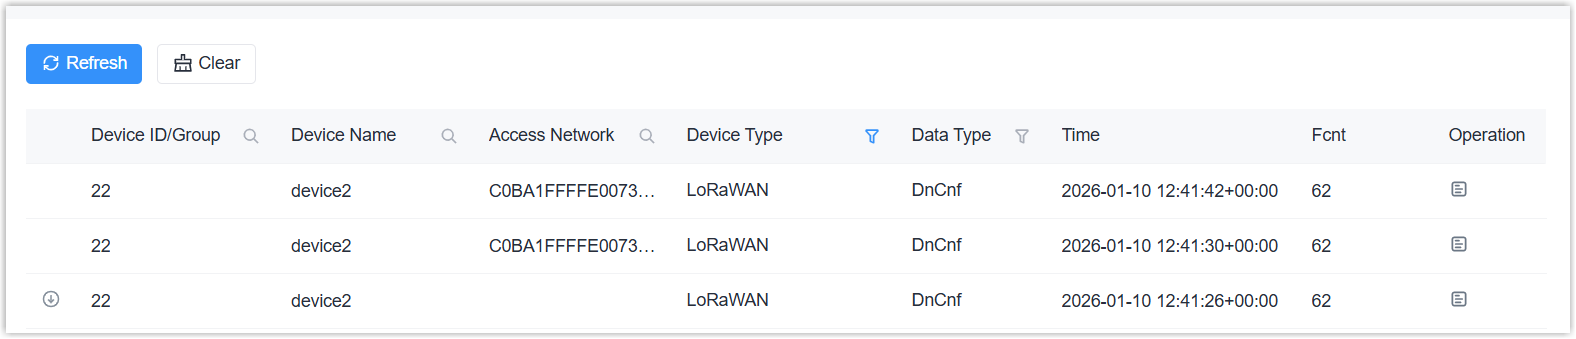
- Navigate to Data Service > Data Stream to check the
downlink sending status.
- On the left bar, select Data Service > Data
Acquisition page.
- Read/Write Other Devices
-
- On the left bar, select Data Service > Data
Acquisition page.
- On the top bar, select Device tab.
- Select the desired device, then click
the object count value to navigate to the Object List
page.
- Follow the above steps to add and enable objects.
- Click
 of the desired object in
the Operation column.
of the desired object in
the Operation column. - Select Get Value to read latest value, or click
Write to write this value. The read/write permission
depends on the data type or access mode.

- On the left bar, select Data Service > Data
Acquisition page.