Introduction
Extreme protection is important for any electronic device, but especially so for surveillance cameras used for harsh outdoor applications. To further enhance stability, Milesight Pro Dome camera is equipped with IP67-rated weatherproof housings and innovative clamshell design, also Pro bullet and Mini PTZ Bullet cameras are equipped with IP66-rated weatherproof housing and Junction box. All of these designs efficiently keep dust and moisture from damaging the internal components of the cameras in all weather conditions. Except simplifying the installation process and tidying the cable connection, the Junction Box can also fully display its excellent waterproof performance once it's being set up in a correct way.
How does the Junction Box for Pro Dome guarantee the powerful waterproof function?
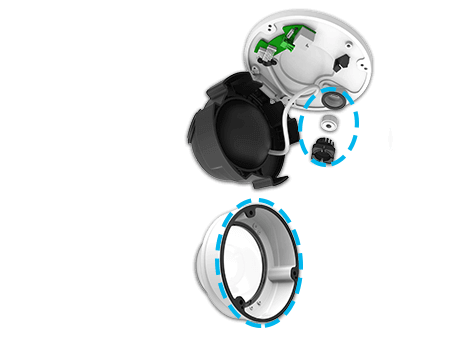
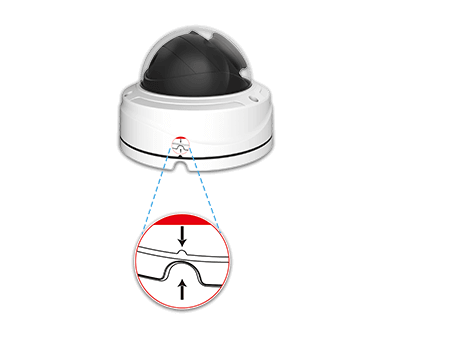
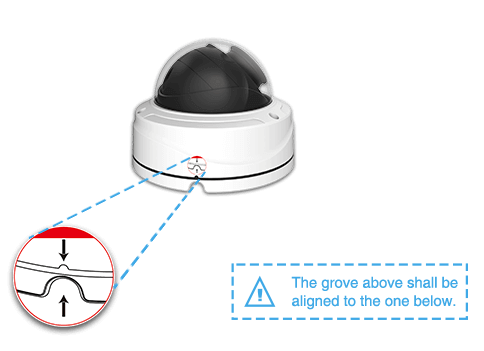
For Milesight Pro Dome Network Cameras (available models: MS-C2972-F(I)PB, MS-C3772-F(I)PB, MS-C4472-F(I)PB), the Junction Box is cleverly designed to realize true water-proofing. A thin Rubber Ring is glued to the Dome Cover to achieve better sealing effect between the Dome Cover and the Dome Body. A Waterproof Connector, which consists of a White Rubber Ring and a Black Rubber Bung is tightly plugged in the Cable Entrance Hole, therefore, the ingress of moisture is blocked wherever the camera is installed (Figure 1). However, the powerful waterproof function can't be fully brought into play without the procedure that the small groove above shall be aligned to the groove on the base when the Dome Cover is being closed up (Figure 2).
How to set up the Junction Box for Pro Dome in a right way?
Milesight engineers have racked their brains and experimented times and times again, thinking about the most effective way to let the Junction Boxes make the best use of every component. Proper installation would be the first step to achieve that purpose.
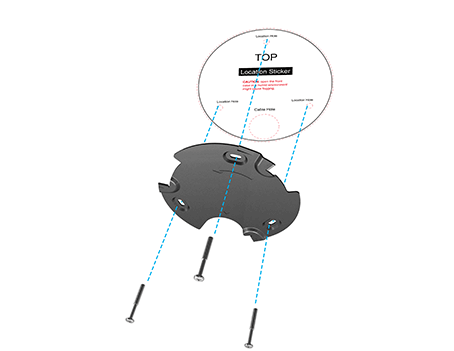
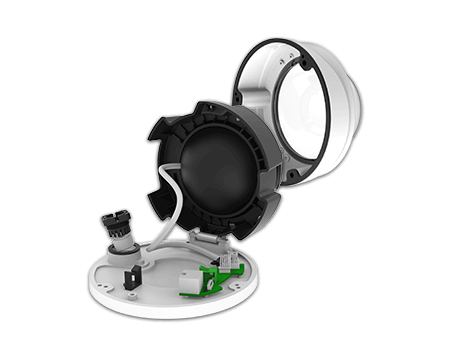
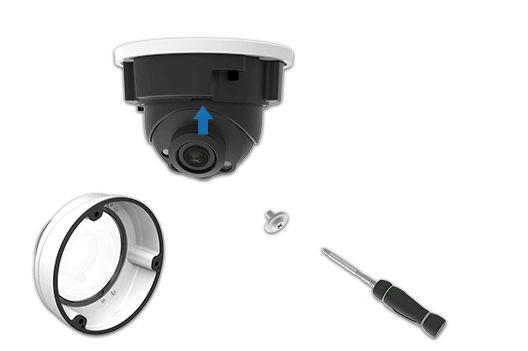
Step1: Fix the Bracket to where the camera is intended to be installed (Figure 3). Unbolt the screws on the Dome and remove the Dome Cover, then open the 'Clam-shell' (Figure 4);
Step2: Take off the Waterproof Connector, put the cables through the Cable Entry Hole, then fix the camera on the ceiling or wall (Figure 5);
(Note: The Ethernet Cable should be round one instead of flat one.)
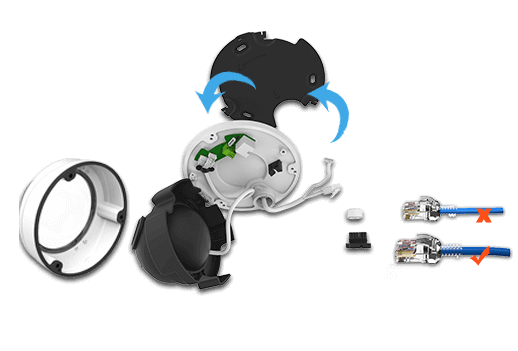
Step3: Place the Piercing Cap on the Ethernet Connector, and put the cables through White Rubber Ring. Take off the Piercing Cap and put the cables through the Black Rubber Bung, as shown in Figure 6. (For more convenient and easier setup, the cables shall be put hard through the White Rubber Ring from the large opening to the small opening);
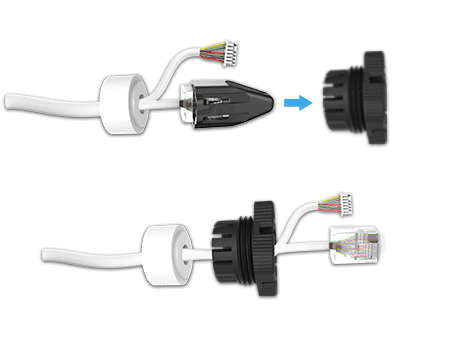
Step4: Recombine the Black Rubber Bung and White Rubber Ring as a unit, then plug the Waterproof Connector tightly into the Cable Entry Hole (Figure 7);
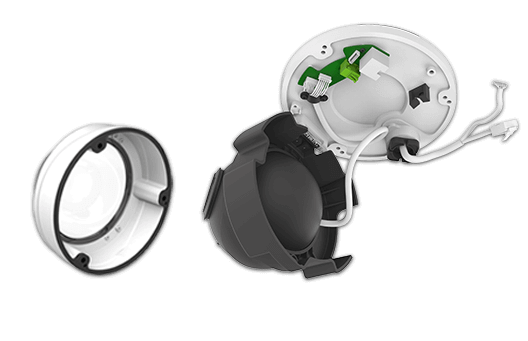
Step5: Adjust the cables to a suitable length and place, and connect the cables to the corresponding interfaces, and buckle the cables by the Black Clamp on the base in case that the cables turning twisted and mussy (Figure 8);
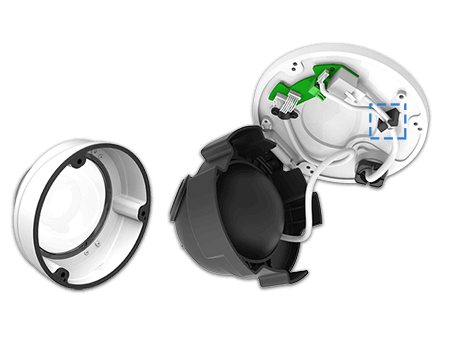
Step6: Close up the “Clam-shell”, adjust the angel of lens and secure the screws (Figure 9);
Step7: Attach the Dome Cover (Making sure that the small groove above is aligned to the groove on the base), then secure the screws (Figure 10);
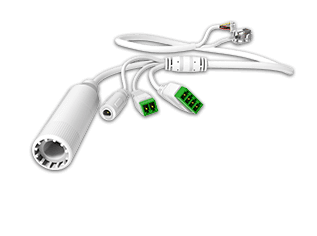
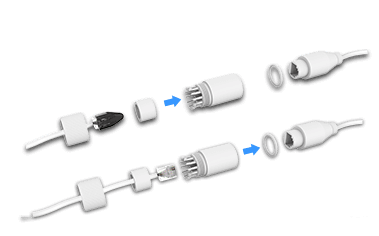
Step8: If you use Milesight equipped Multiple-interfaces Cable (as shown in Figure 11), the Ethernet Port is also well protected. Put the Ethernet Cable through Screw Nut, place the Piercing Cap on the Ethernet Cable and put it through the Rubber Ring(Figure 12). Take off the Piercing Cap and put the cable through Screw Bolt, after that, screw them (The O-Ring shall be set on the Network Port Connector, and the Ethernet Cable shall be the round one instead of flat one, Figure 13).

How do the Junction Boxes for Pro Bullet/Mini PTZ Bullet guarantee the powerful waterproof function?
For Milesight Pro Bullet Network Cameras (available models: MS-C2962-(R)F(I)PB, MS-C3762-F(I)PB, MS-C4462-F(I)PB), and Mini PTZ Bullet Network Cameras (available models: MS-C2961-EB, MS-C4461-EB) the Junction Box develops itself continually so as to cater to Milesight customers' higher requirements.
Default Version Junction Box
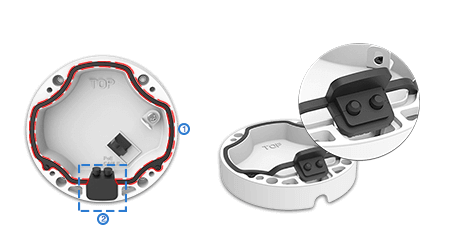
The default version Junction Box is for only Pro Bullet Network Camera gained its popularity before thanks to its user-friendly design. Similarly, a thin Rubber Ring ① is glued to the Junction Box to guarantee the tight sealing between the Camera Body and Junction Box. Besides, the Rubber Plug ② on the Cable Entry Hole also was being rigorously designed. It works as a doorkeeper who keeps the water or dust out all the time (Figure 14). However, the cooperation of the small Rubber Plug, which shall be plugged whenever the users don't need to use the holes on the Rubber Plug is vital (Figure 15).
Advanced Version Junction Box
Through long time experience accumulation and technology development, Milesight Junction Box for Pro Bullet and Mini PTZ Bullet has been great improved for better user experience. The advanced version Junction Box achieves both practical functionality and esthetic pleasure.
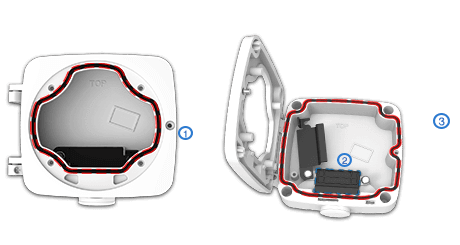
In the aspects of practical functionality, both the Front Cover and Rear Cover ③ are glued with a thin Rubber Ring and the Rubber Ring on the Front Cover ① helps the Bullet closely hug the Junction Box. Working as a line of defense, the Black Rubber Plug ② performs so well in the aspect of waterproof when the Metal Plate is locked up (Figure 16).
How to set up the Junction Boxes for Pro Bullet/Mini PTZ Bullet in a right way?
Default Version Junction Box for Pro Bullet
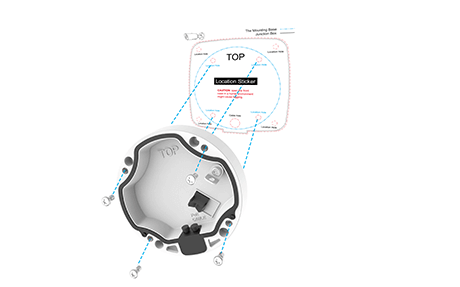
Step1: Fix a sticker on the position where the camera is intended to be installed (Figure 17), and take out the Black Rubber Plug on the Base;
Step2: Put the cables you need through the Base and Rubber Plug (For more convenient and easier setup, the cables can get through from the Side Opening of Rubber Plug, as shown in Figure 18); Fasten the Base to the sticker, then hang the Bullet via the hook on the Base;
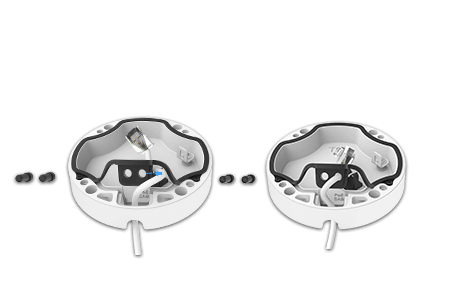
Step3: Adjust the cables to a suitable length and place, then connect the cables to the corresponding interfaces. Buckle the cables by the Black Clamp on the Base in case that the cables turning twisted and mussy (Figure 19). Plug the Black Rubber Plug back to the Cable Entry Hole to prevent the ingress of dust or water;
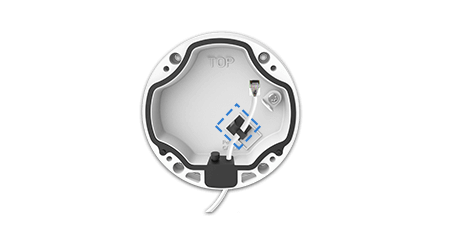
Step4: Whenever you don't need to use the holes on the Rubber Plug, making sure that the small Black Plug is tightly stuffed up (Figure 20);
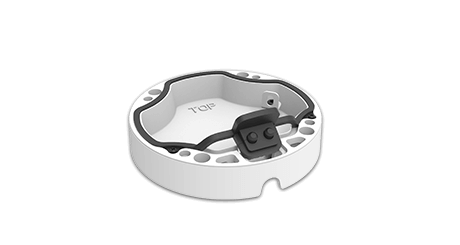
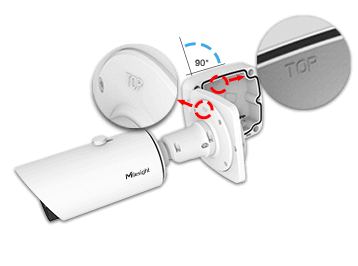
Step5: Install the Bullet to the Junction Box, and pay attention to the two “Tops”. The “Top” on the Bullet shall be aligned to the “Top” on the Junction Box (Figure 21). At last, fix the screws.
Advanced Version Junction Box for Pro Bullet/Mini PTZ Bullet (We will take Pro Bullet as an example below)
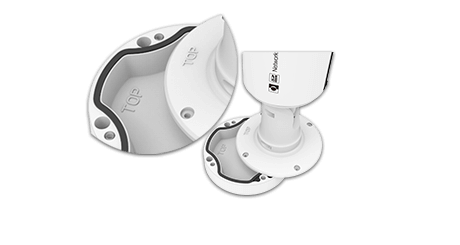
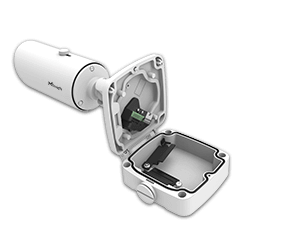
Step1: Unbolt the screws on the junction part between the Front Cover and Rear Cover (Figure 22) and remove the Front Cover (Making sure that the Front Cover is removed from the direction that roughly perpendicular to the Rear Cover, as shown in Figure 23). Install the Front Cover to the Bullet;
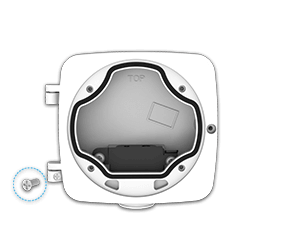
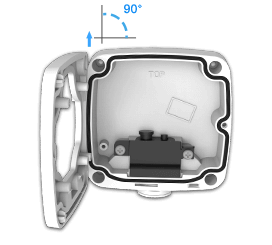
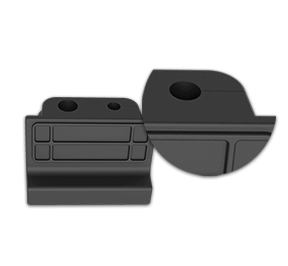
Step2: Fix a sticker on the position where the camera is intended to be installed. Unlock the Black Metal Plate and take out the Black Rubber Plug (Figure 24). If the cables are put through from the wall, then put the cables you need through the Cable Entry Hole ① as shown in Figure 25. If the cables are put through from the side, then prick the White Rubber Bung and make the cables get through the White Rubber Bung and the Cable Entry Hole ② (For more convenient and easier setup, the cables can getting through from the Inside Opening to the Outside Opening of the Rubber Plug, as shown in Figure 26). Fasten the Rear Cover to the sticker;

Step3: Put the cables through the side opening of Black Rubber Plug (Figure 27. The side opening of the smaller hole has been cut, you can cut an side opening for the larger hole and choose one hole to put the cables through according to your need). Whenever you don't need to use the holes on the Rubber Plug, please note that the small Black Plug shall be tightly stuffed up (Figure 28);
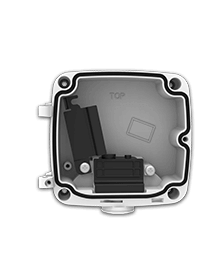
Step4: Reinstall the Front Cover with the Bullet to the Rear Cover (Making sure that the Front Cover is installed from the direction that roughly perpendicular to the Rear Cover). Similarly, pay attention to the two “Tops”. The “Top” on the Bullet shall be aligned to the “Top” on the Junction Box (Figure 29);
Step5: Adjust the cables to a suitable length and connect them to the corresponding interfaces;
Version A
If you choose the Junction Box of Version A (as shown in Figure 30), connect the cables to the interfaces on the Front Cover;
Version B
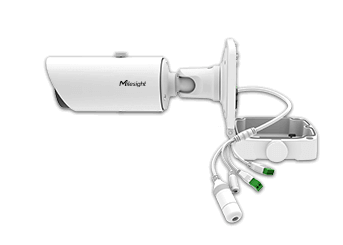
If you choose the Junction Box of Version B (as shown in Figure 31), connect the cables to the interfaces of the Multiple-interfaces Cable, then manage the cables well in the Junction Box;
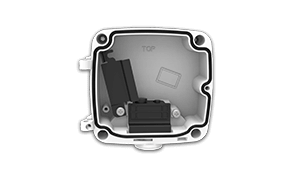
Step6: Turn the Black Rubber Plug back to the Cable Entry Hole ① (Figure 32) to prevent the ingress of dust or water. Put back the Black Metal Plate and screw it tightly (Figure 33);
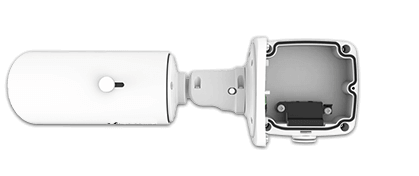
Step7: Close up the Junction Box and fix the screws.
Advantages of Milesight waterproofing cable management
- Resisting the ingress of moisture;
- Shielding the sensitive electronics of cameras from dust and water;
- Ensuring the stable operation of cameras in all weather conditions;
Conclusion
Bearing customers' needs in mind, Milesight Junction Boxes are smartly designed to fully realize the cable management and waterproof goal. We hope you do well know the proper installation of Junction Box and truly making their performance greatly beyond your expectation.


